Friday 30 November 2012

Friday Funny


Patrick walks into a bar in Dublin, orders three pints of Guinness and sits in the corner of the room, drinking a sip out of each pint in turn.  


When he had finished all three, He went back to the bar & ordered three more. 

The barman says, "You know a pint goes flat soon after I pull it ........... Your pint would taste better if you bought one at a time." 

Patrick replies, "Well now, I have two brodders, one is in America and de odder in Australia and here I am in Dublin.  When we all left home, we promised dat we'd drink dis way to remember de days we all dranktogedder." 


The barman admits that this is a nice custom and says no more. 


Patrick becomes a regular customer, and always drinks the same way ....... Ordering three pints and drinking a sip out of each in turn, until they are finished.  

One day he comes in & orders just two pints.   

All the other regulars in the bar notice and fall silent. 

When he goes back to the bar for the second round, the barman says, "I don't want to intrude on your grief but I wanted to offer my condolences on your great loss." 

Patrick looks confused for a moment, then the penny drops and he starts to laugh.

"Oh no," he says, "Bejesus, everyone is fine!  

Tis me,......................... 
I've 
Quit Drinking !"

Thursday 29 November 2012

Tim's November Tag Take 2

Hello again!  

My Friend Lesley and I are having a Crafting Day next week (on a school day too!) and, having seen a few projects that I have done recently, Lesley has asked me if I would show her on Friday how to do the resist technique as she is not sure how to go about it.    

Well I was sitting in my room the other evening, there were a few inks on my desk, and a tag and one thing led to another.......Who could "resist" the lure of new stamps ey?  So now I have two tags for Tim Holtz's November tag!  

I used my TH tag die and SU vanilla cardstock, the same stamp set as I used for the original stamp set, but as you can see the Tree one.  This time I used some paper tape, lace and ribbon (that ribbon is sooo precious I only use it on special projects!).  Some pins in the ribbon and string at the top and hey presto.
I decided to add just a little texture by adding glossy accents to the baubles.  It is a shame the lighting in the mornings is sooo pants lately as you cannot see the perfect pearls mist on there!

Thanks for calling by.

TTFN

Hettie

Wednesday 28 November 2012

O Tannenbaum - Tim Holtz style!

Hello Peeps

Just thought I would show you some silliness I have been making for friends and family, and our Dining Room table for Christmas.  You may recall I made two a little while ago, one of which I gave to my Mum when she was poorly, and that I was looking for more flower pots.  Well I found some slightly smaller ones and to be honest I think these are slightly  better in proportion to the trees.  Though the photo does not show them very well, these have all been sprayed with either Glimmer Mist or Perfect Pearls.  

I have quite a forest of trees here as you can see.  I just carried on until I ran out of pots, though I wanted to keep one as I have another idea up my sleeve!  I started making these on Saturday at my friend's so I let her have the first one I made, which is not pictured here. 

Some of them I have put the muses on to reflect the recipient e.g. G for my nephew whose surname is Griffiths and M for Michelle, whose husband was instrumental in getting an essential part of the trees for me.

As I raided my Christmas Snippets box (yes of course I keep Christmas Snippets separate from any other kind of Snippet) I shall be putting these into the Playground as well as, of course, putting these into the Rudolph Day Challenge.  You have until Saturday night to enter into the RD Challenge.  This is a lovely wax set to win.  

I have just realised you can see a Christmas Tree through the window here.  That tree was given to Hubby's parents by the chaps working at the Forestry Commission the year Hubby was born.  As you can see it is still growing strong!  I would like some mad volunteers to help me put lights on it one day!  Any volunteers?  Teehee!

Hugs

Hettie


Tuesday 27 November 2012

Funkie Junkie Tag 1 - SSS

Hello Friends

Do you remember a short while ago I told you about a challenge I had discovered by the lovely Linda Coughlin over at the Funkie Junkie Blog (click HERE for more deets)?  Well if you recall Linda was already up to Tag 9 so I had some catching up to do.  So where better to start but at Tag 1?  (Linda is up to Tag 11 so I need to get on with them!)  So here goes....

Here is Linda's piece first (a stunner if I might say so Linda!)...


Well here is my take on Linda's tag....


As I have mentioned before I don't do Stars but I do do Hearts.  

Some close ups and some details.  Tag was cut with SU Vanilla cardstock using my TH die.  The tag was swooshed with Picket Fence and Bronze Distress Stains.  I stamped my TH flourish stamp on the top right using some Ferro paint mixed with some puff paint, however, I think my stamp had mostly Ferro paint on it! Love the shimmer on it though.  
The Angel wings I have had for years and years and.....(you get the idea), the button came from a button stall at the NEC (I have the card somewhere if you really want to know the supplier.  Just add it in the comments and I will dig it out for you).  I could have spent hours and a small fortune at that stall as they were all wooden and in any shape or form you could think of.  Expect to see a few more as this wasn't the only one I bought!  The Burlap (string in the UK) came from Funkie Junkie shop (love it).  The "25" and the two larger hearts were cut using Sizzix and TH dies using a wrap from Coffee 1.   The two smaller hearts were cut from Snippets of card and covered with TH Tissue Tape. 

At the bottom left of the tag I used a stencil and the puffed paint and Ferro mixture, heated it with the heat gun, painted over the top with Fresco paint (Vintage Lace), then I stamped over the top with the bronze DS using my TH flourish stamp again, and I stamped over the two smaller hearts at the same time.  I got my Treasured Gold wax and brushed over the top of the raised parts as well as the 25 and hearts.  I distressed the edges, wrote out the sentiment on Snippets and added the lace, bells and burlap.

You have until 17th December to catch up with all 12 tags and there is a chance to win a prize  from the sponsor Funkie Junkie  Love their goodies and to be honest, postage was not an awful lot in the context of things and pretty quick to the UK (8 days from order to parcel!).

Hope you like!

I am now entering this into the following challenges:-

Funkie Junkie - Tag 1
Simon Says Stamp - Project with a Heart
Rudolph Day - Christmas 
Snippets - Using Snippets

Thanks for calling by and please leave me a comment.  Don't forget it is not too late to join in with these 12 Tags of Christmas with Linda.  There is a prize too, as well as some beautiful tags to look at.  Click HERE to get to Tag 1, from where you can view the others.

Hugs


Hettie

Monday 26 November 2012

Happy Birthday and Congratulations...

Hello Friends

Last week I had to make two cards in a bit of a hurry, one a Birthday card and the other a Congratulations card.  So I pulled out my favourite Penny Black Stamp, the spare A cards I made the other week, some Snippets, punches and inks.

I stamped the PB and SU stamps with Cobalt Blue Archival ink, blasted them with the the heat gun and coloured the flowers in with the Stormy Sky Distress Marker.  I then trimmed the larger stamping to fit the card, punched the tag, stamped a text stamp and punched the butterfly.

The little word tabs are part of the set I am trying to use up.  Inside I have stamped Happy Birthday and Well Done respectively.

As I have used Snippets I am going to pop this into the Playground.  I want to do a wreckie to see where we are going to put the brazier for roasting chestnuts on!  After the Bonfire Party I need to check on the Elf 'n Safety of the idea.

Hugs

Hettie.

Sunday 25 November 2012

Gilding Flakes Musical Christmas Mark II - Rudolph Day

Hello Peeps

You remember a few posts I showed you a card I had made using Gilding Flakes?  Well, I liked it so much, and as I had made some extra elements so I thought I would try the other colour of Guilding Flakes I have and make another.......

This time it is on a red background and I have only stamped the background once. 
I sooo love the music stamp and the Poinsettia.  I think I prefer this to the first card.  The colours in the gilding flakes are nicer and the background does not seem to be as busy.  I don't think I sneezed this time either as there are less flakes in my room!

It is the last Rudolph Day of 2012 before the Big Day!  Yikes!!! Where did the last 11 months go?  Thanks Sandra for keeping this going all year.  It is great to know that I have cards  ready to send without having a major panic round about now trying to get cards made!  

Have a great Crafting weekend.

Hugs

Hettie

Friday 23 November 2012

Friday Funny....Perfect Wedding


I was a very happy man. My wonderful girlfriend and I had been dating for over a year, and so we decided to get married. There was only one little thing bothering me...It was her beautiful younger sister.

My prospective sister-in-law was twenty-two, wore very tight mini skirts, and generally was bra-less. She would regularly bend down when she was near me, and I always got more than a nice view. It had to be deliberate. Because she never did it when she was near anyone else.

One day her 'little' sister called and asked me to come over to check the wedding invitations. She was alone when I arrived, and she whispered to me that she had feelings and desires for me that she couldn't overcome. She told me that she wanted me just once before I got married and committed my life to her sister. Well, I was in total shock, and couldn't say a word. She said, 'I'm going upstairs to my bedroom, and if you want one last wild fling, just come up and get me.'

I was stunned and frozen in shock as I watched her go up the stairs. I stood there for a moment, then turned and made a beeline straight to the front door. I opened the door, and headed straight towards my car.

Lord... And behold, my entire future family was standing outside, all clapping! With tears in his eyes, my father-in-law hugged me and said, 'We are very happy that you have passed our little test. We couldn't ask for a better man for our daughter. Welcome to the family.'

And the moral of this story is:


Always keep your condoms in your car.

Thursday 22 November 2012

Christmas is only ..... days away!!

Hello Friends

I am sure the Elves up in the North Pole are working flat out in readiness for The Man in the red coat to deliver lots of presents next month and much the same can be said for crafters across the globe.  I saw quite a few desks on the WOYWW hop last night with Christmas projects on them.  

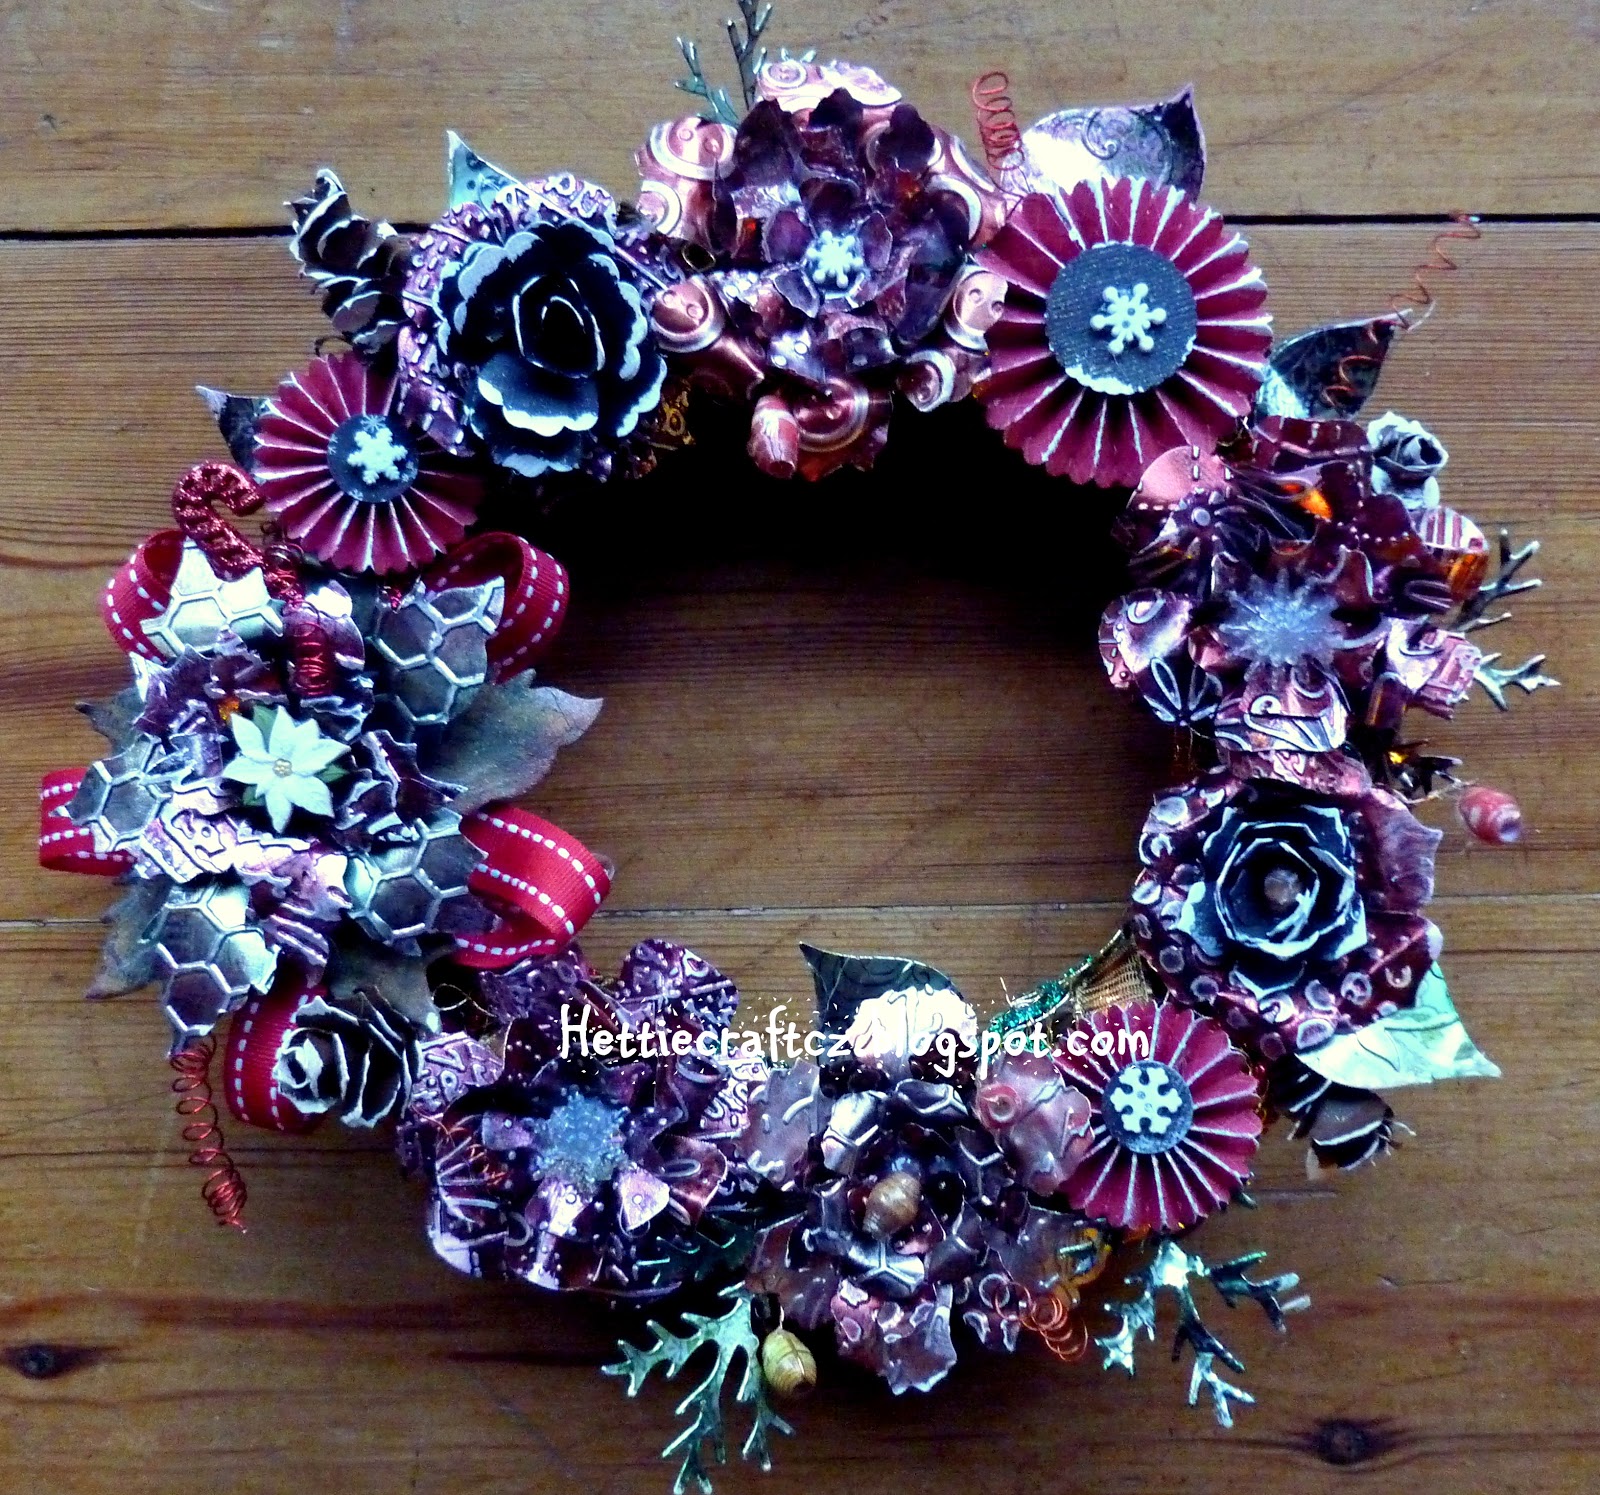
I thought I would share a little something I have made this week and has been in the planning stage for quite some time.  Hope you like it..... 

Shall I let you into a secret?  This Wreath is actually old and recycled!  Yep!  The wreath is willow and I originally decorated it some 4 maybe 5 years ago when I first had my Silhouette machine and discovered Perfect Pearls!!  I cut out lots of leaves out on the Silhouette and then inked them up and sprayed them with Perfect Pearls.  I also made some wire spirals and paper beads, which I had learnt how to make the first time I went to Cornwall. 
And here you can see the wire spirals and paper beads (also recycled).  The flowers are primarily made from metal, some with chipboard bases for firmness.  Some of them are made with metal sheets left over from a project I did in Cornwall nearly 2 years ago and some of them with metal card which I had from Paperartsy when I renewed my subscription to a certain magazine (CS) some time ago.

My new TH Poinsettia dye has been used here with an extra layer at the bottom of chipboard which was covered with paper, inked and stamped.  I wanted to ensure that the poinsettia did not try to wrap itself around the willow wreath.
All the metal was inked with TH alcohol inks, stamped with various stamps, embossed with embossing folders, sanded and then layered using hot glue.  Once I was happy with the flower shape I arranged around the wreath, wrapped the wreath in ribbons, added spirals and beads which were wired in place and then set about attaching the flowers, leaves, pinecones and rosettes using my glue gun. 
Here is a SU punched flower which was actually left over from my recent Halloween Mail Box project which I added some "snow" using my Ranger paint dabber.

Some of the paper beads I used as centres to the flowers and the various snowflake buttons and elements were brought back from the US by my friend last year.  The rosettes were in my box from making them last Christmas for my Christmas Album cover.
Unfortunately these photos were taken in the house so the sheer shimmering effect cannot be appreciated in these photos.  I have sprayed the whole Wreath with Perfect Pearls Heirloom Gold mist which has given it even more shimmeriness!

Thanks for sticking with me to the end!  I hope you like my Wreath and maybe you will feel like making one yourself.  It really is quite simple though a little fiddly.  Also, be careful when using hot glue to affix the metal layers....the metal gets hot too when you push the top layer down with a finger.  Use a pencil instead! 

I am entering this wreath in to the following challenges:-

Compendium of Curiosities - Texture fades
Frilly and Funkie - Chipboard and Metal
Snippets Playground - Snippets
CC101 - Altered Metal 

TTFN

Hugs

Hettie

Wednesday 21 November 2012

WOYWW 181 - you may want to look away!

Hello Friends

It seems ages since I joined in with the mayhem of WOYWW  with the Queen of Nosieness but the weeks are kinda running one into another.  I presume you all know what WOYWW is - What's On Your Workdesk Wednesday - take a piccie of your desk and link up to Ms Julia to join in with the biggest blog hop of the world...probably!

So for those of you who dislike tidiness you may want to look away now.......

I am trying to be tidy at the moment as I have a fair bit of crafting to do between now and the Big Day so I reckon if I keep my desk tidy between jobs, and do one job at a time, it will be easier to find everything.  That is the theory anyway!  Excuse me while I just polish my halo or is that the bell on my Santa's Elf hat?

For those of you who saw me working on my Christmas Album at The Crop, I can now report it is finished ready for 1st December!  Woo Hoo!  The cover is not done but I always keep that job for when I finish the album, though I do have some of the elements ready.  Hopefully I will get the whole album finished sometime in January as opposed to about May this year!!  

Right then.  You know what to do.  Please leave me a comment and then either link on the WOYWW or the button on my side bar to join in the fun.  I am in work and then out to dancing tonight, but I will try and get back to you very soon, but I WILL get back to you.

TTFN

Hettie
xx

Tuesday 20 November 2012

Sending a hug....

Hello Friends

A Special Friend of mine is feeling a little down at the moment and I wanted to send her a hug so I made her this card.....

I do so love this style of card and am grateful to a lovely Bloggie Buddy for passing on the deets of how to make them.  I used my Forever Friends stamp and coloured it with Copics.  I used some more of my Snippets, my SU tag punch and stamp set with Seedless Preserves DI (can you tell I love this ink at all?).  The butterfly is a Martha Stewart punch with some Seedless Preserves ink which I just wiped on the cardstock before punching.  The "With Love" embellishment is one that I have had for ages, and which I am trying to use up.

Short and sweet.   Off to find some blue wool to make another scarf for a Chrissie pressie, having taken a peek over at the Playground as I just spotted something to look at!  Need to put my wellies on first! 

TTFN

Hettie


P.S.  Rachel, Sandra and I are going Puddle Jumping in the Playground if anyone wants to join us you are more then welcome!  

Monday 19 November 2012

Happy Birthday Rachel...Not quite a Tag!

Hello Friends

What a perfectly miserable Monday morning it is weatherwise!  But you know what means......Perfect weather for crafting in!  Well I would do if I was not in work!

It was my very good friend Rachel's birthday last week and just a few weeks ago Rachel was in my Craft Room for, as she puts it, "a darned good nosey"!!  She asked me why I had all the tags around my room?  I told her that some of them are for challenges and by creating artwork on tags, it is also a good way of practising new techniques or ideas without wasting too much paper/time to discover whether you like it or not.  Well one of the tags that caught Rachel's eye was one I made using the embossing powder resist technique so to prove a point, I made a card version of that tag and here it is.....

I also got chance to use my new favourite DI - Seedless Preserves, as well as Rusty Hinge, Dusty Concord, Vintage Photo and Old Paper.

The bluey/purple background card is created using the card that I put in the base of my spraying box when using colourwashes/shimmers.  When I think they look interesting I take them out and refresh with fresh cardstock!  The butterflies and SU tag were also stamped onto Snippets of card coloured in the same way. Immediately behind is a piece of silver mirrored card, again a Snippet left over from a Christmas project no doubt. 
The ribbon was also salvaged from the Snippets boxes which I must have had left over from making one of the other ribbons on that die and the flourish I found in my embellishment tin.  You can see the button I cheated with thread by drawing with another great find......Sharpies White pen.  Brilliant.  Craft Obsessions have them.  The best white pen EVER!

So overall I think I am entitled to link this up with Miss Di's Playground.  Must remember to put the wellies on before I go over there!  

TTFN and thanks for calling by.

Hettie

Sunday 18 November 2012

12 Tags of 2012 - November!

Hello Friends

As some of you know I went on a lickle day trip to the NEC for the Hobby Crafts Craft Fair the other week and spent some of my hard saved up pennies on some goodies.  Well when I saw Mr Tim Holtz's Tag for November I could not resist (get it!) having a little stamp with some of my new goodies and joining in!   

At the show I had in my hand the set of Tim Holtz stamps or the Soldier die and as you can see the stamps won.  Well, they were on a ridiculously good offer with Craft Obsessions how could I leave them there?  Especially as when I went past a little later all of these sets had gone!  (I am grinning now!)

And here is another little close up so you can see the stamping on the background. This is one of the only times I do not mind ironing!!

Now Mr Holtz wanted us to use Distress Stains but I don't have many colours and certainly not the colours I wanted to use (the Seedless Preserves are to die for!).  So I used the good ole' wrinkle free distress method for colouring the background.  The word "Joy" came from the Season's Silhouettes stamp set.  

Hope you like and please leave me a comment so I know you have been.

TTFN

Hettie

Friday 16 November 2012

Friday Funny


A woman in her forties went to a plastic surgeon for a face-lift.

The surgeon told her about a new procedure called "The Knob," where a small knob is placed on the back of a woman's head and can be turned to tighten up her skin to produce the effect of a brand new face lift.

Of course, the woman wanted "The Knob."

Over the course of the years, the woman tightened the knob, and the effects were wonderful -- the woman remained young looking and vibrant.

After fifteen years, the woman returned to the surgeon with two problems.

"All these years, everything has been working just fine. I've had to turn the knob and I've always loved the results, but now I've developed two annoying problems:

First, I have these terrible bags under my eyes and the knob won't get rid of them."

The doctor looked at her closely and said, "Those aren't bags, those are your breasts."

She said, "No point asking about the beard then..........."

Wednesday 14 November 2012

How did I miss this Challenge - Tag 9 - But I will catch UP!

Hello Friends

I was wandering around on the blogasphere recently and I came across THIS wonderful Blog which is Linda Coughlin's of The Funkie Junkie!  Wow!  I was blown away by all the loveliness on her blog and discovered that Linda hosts "The Funkie Junkie's 12 Tags of Christmas" which if you click HERE you will be taken to Tag One which has all the deets on.  It is worth just going to see all nine tags, they are gorgeous.

I know Linda is currently on Tag 9 and there are only three more to go but there is still a while to go until the Big Day itself so I guess I can give it a go.  They are sooo scrummilicious I just have to join in!  There is also a chance to win a shopping spree as these challenges are sponsored by The Funkie Junkie shop.  Let me tell you, having had a peruse and a little shop there, having recently won the CC2C Challenge, it is worth the chance to win! 

So here is Linda's tag......

Didn't I tell you it was scrummy!

Now here is my take on Linda's tag.......
Instead of stars I have used hearts made from Snippets of SU Vanilla cardstock, die cut with a Sizzix die and stamped in Barn Door with my new Wendy Vecchi stamp (in love with these and they were a steal so it would have been rude not to have bought them!).  The burlap pieces were also Snippets from my Christmas Album project.  The key was out of my jar of odd keys and watch bits (I have been told by a high authority - Mr Hettie - that it was the old key for the shed) which I coloured with black alcoholic ink, along with the mini bells hanging on the mini hearts of course!
The Holly leaves were cut out of another Snippet of SU Vanilla cardstock (I keep every piece of the SU Vanilla cardstock in a separate bag as it is great to work with), inked with Pine Needles DI, a little Fresco Snowflake paint topped with glossy accents and some Hampton Art fine glitter sprinkled over the top.  Once dried I added a little more Pine Needles around the edges.
These mini hearts were die cut with chipboard then some Ferro and Puffed Paint were smooshed over and heated with the heat gun.  Love this Ferro.  It is soo schparkly in the natural light. I crimped some wire through the crimping tool and added the bells to the hearts and wired them to the key.  I also popped two star pins into the bow, which is a Snippet of fabric my quilting friend gave to me.

The base of the tag is Kraft cardstock which I ran through the TH woodgrain embossing folder.  I painted this with the Snowflake Fresco paint and once dried added a layer of TH Rock Candy Crackle paint and once that was dried I added some Black Soot DI.

A little TH ticket and some gingham ribbon and hey presto, my tag was finished.  Now then, which one shall I do next?

You have until 17th December to catch up with all 12 tags and there is a chance to win a prize  from the sponsor Funkie Junkie  Love their goodies and to be honest, postage was not an awful lot in the context of things and pretty quick to the UK (8 days from order to parcel!).

As there are a few Snippets on this I will be linking it up to my Buddie at the Playground.

Thanks for popping by and please feel free to leave me a comment.  Gotta love comments. And finally, thank you Linda for such a wonderful Challenge, I have enjoyed making this no end, and think it will live in my kitchen.  Anyone who has been in my kitchen will know there are a collection of hearts in there!

TTFN

Hettie


Monday 12 November 2012

Finished beading project!

Hello Friends

At the WOYWW Crop last month, Janet over at Fairthoughts took a little workshop to make a beaded project.  I did not get chance to finish it on the day and a friend of mine offered me a crimping tool (and tuition) in order that I could finish it.  Here it is....

Sorry about the background, it is cork and the light was funny but the colours in the keyring are very close.

A few little turns for you to see all sides...
It was a lovely project and I will work out where I am going to put this (not on a bunch of keys that is for sure) in due course.  At the moment I am enjoying seeing it hung on the board with the sun catching it.

Thanks Janet for teaching this.   As you can see I had a few bits and pieces which matched.  Not hard really as I am rather fond of purples and various shades of!

TTFN

Hettie

Sunday 11 November 2012

Musical Christmas - FSC

Hello Friends

At the end of last month I shared with you THIS post which had my altered Mail Box on and which I had entered into the Fashionable Stamping Challenge.  I was very pleased to learn that I had won the Challenge!  

I had not come across this Challenge blog before I was introduced to it by Terry, but I rather like it so I decided to enter the current Challenge which is Music and here is my card.....

The background of the card has been made using my Tim Holtz flourish stamp and gilded with Indigo Blu gilding flakes (first time of using!  Tip - don't sneeze when using these or else they will get everywhere!).  The next layer is a Snippet of SU Vanilla cardstock which has been inked with Brushed Corduroy DI, although you have to take my word for it as you cannot see it until you fold the music sheet back.

The music sheet was created using a WOW stamp, one of my buys on Thursday, on vellum using a technique shown by Mr Tim Holtz on his 12 Tags of Christmas 2009 (Day 9 I think).  I made the music notes with my new Memory Box die, again using a Snippet of SU cardstock, which I inked with Brushed Corduroy DI and brushed over with some gold Perfect Pearls.  
The Poinsettia was cut with very thin chipboard to which I had attached sheets I had cut out of a Czech book which I am using for another project yet to be completed.  I then inked the petals with DSs and DIs, edged with Black Soot DI and swooshed with my new favourite DS Antiqued Bronze. Once inked and dried  I then stamped over the petals with the music stamp.

I also added some smudges of my Treasure Gold wax to give it some sparkle.

Thanks for looking and why not pop over the FSC and join in as you still have a little time?

Let me know what you think!

Hettie
x