Showing posts with label metal. Show all posts

Wednesday, 4 March 2015

Sealed with a Kiss....Layout

Hello there

I have to apologise to my blog for neglecting it for the last few days.  I have been a little under the weather with the lurgy after someone very kindly coughed and sneezed on me last week.  I came home from my Quilting Group on Saturday feeling dreadful and got generally worse.  I am not going into details ok, but I did not get out of bed much until today.  Though I did have a shock when the person concerned phoned me yesterday to apologise!!! 

Anyway, a few weeks ago I promised to share with you a little layout I had done so here it is...


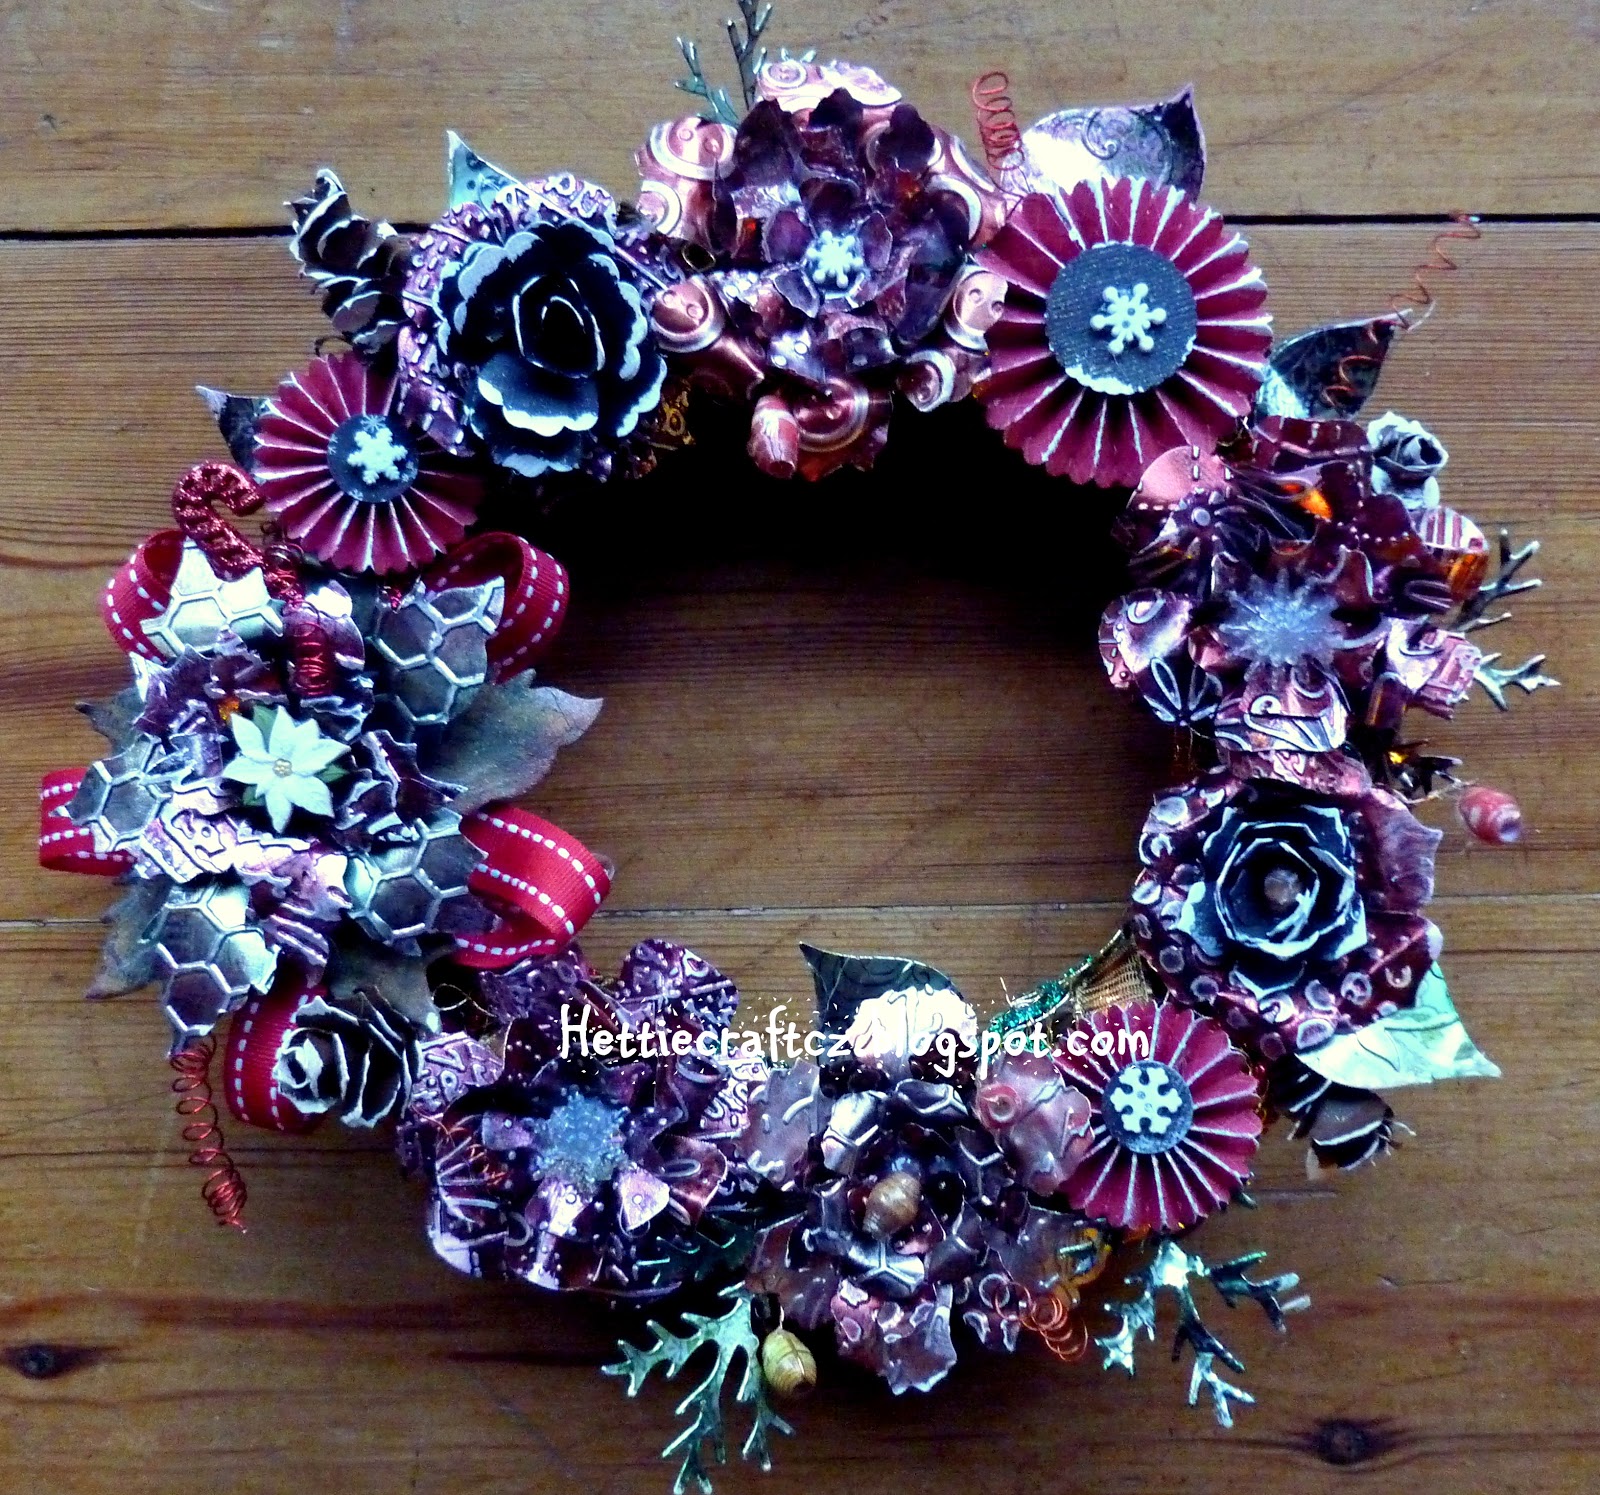
 This is most probably the last layout of my Wedding Album, but note I only said "probably"!!  I have so many photos left still!


So where do I start?  The background piece is a piece of black cardstock and I took some of my stencils, my old white ink pad and an inkie paddie thing (can't remember what you call them now...made by that Tim chappie!) and swooshed some ink through the stencils, one of which is a NBUS bought from US by Memory Box...the one with butterflies on.

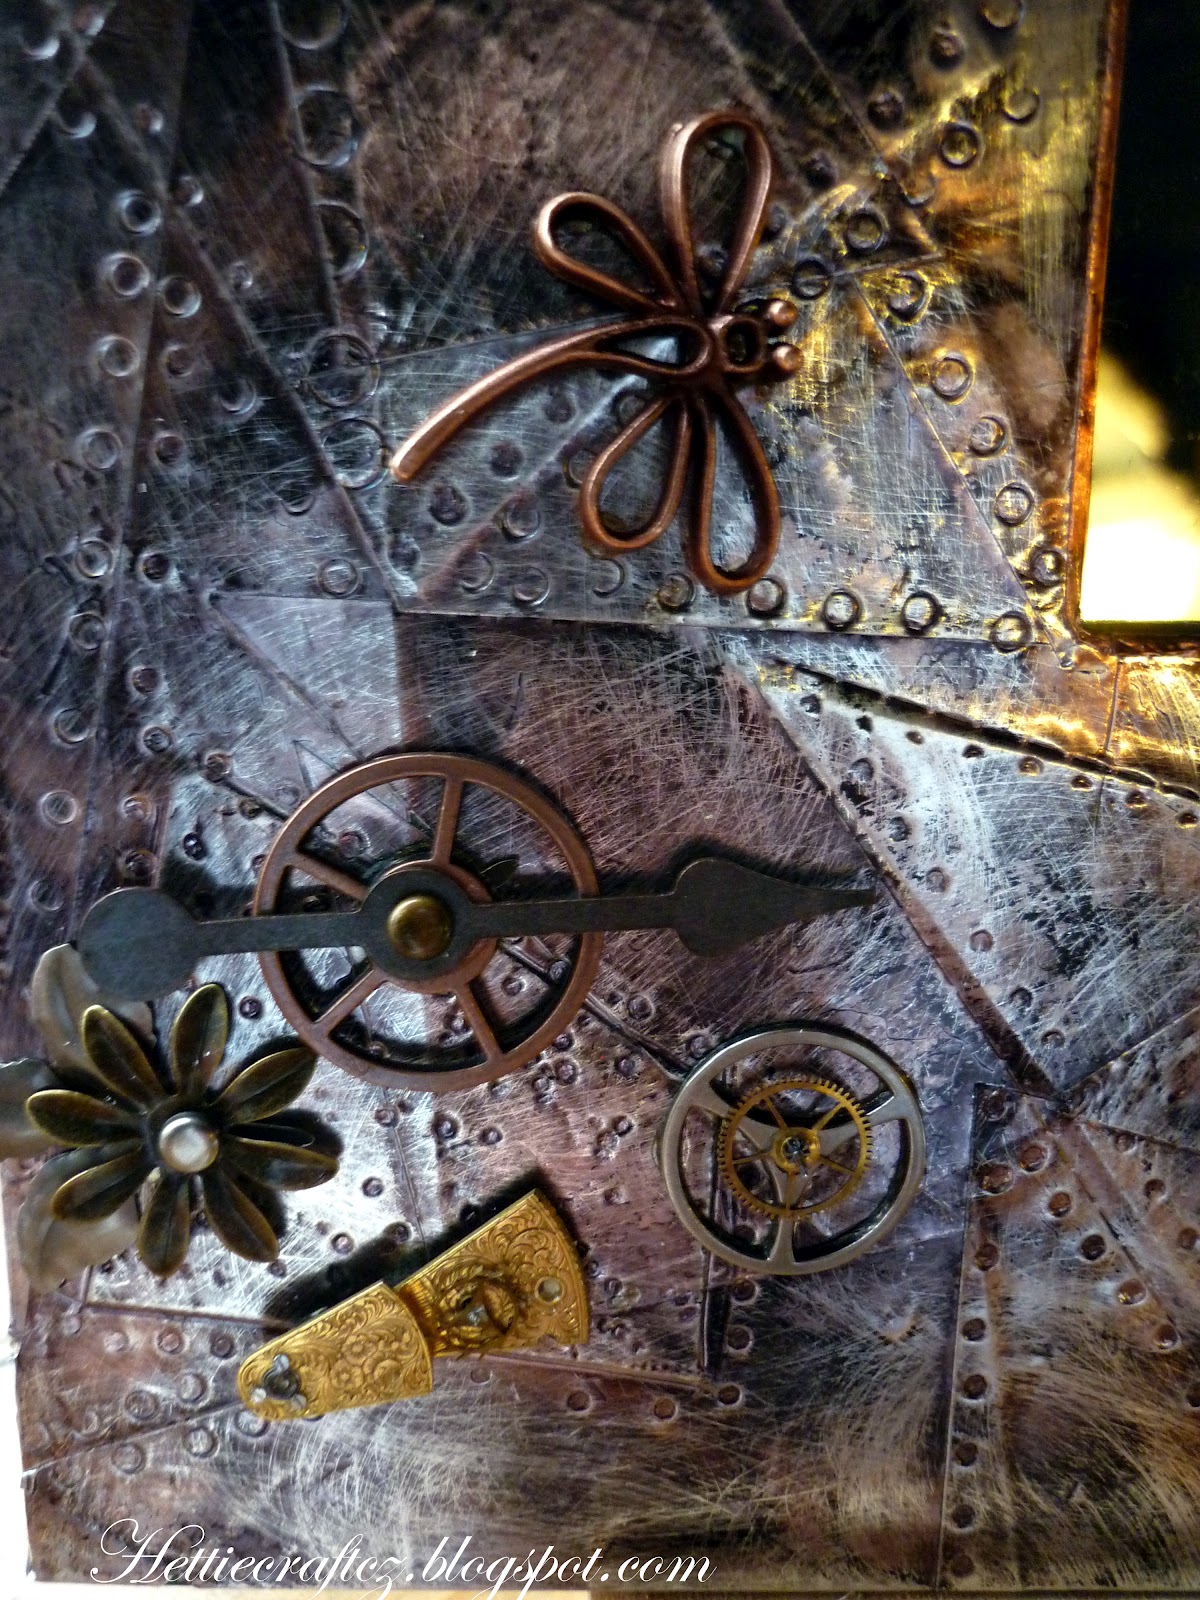
The die cuts are a mixture of some that were kindly sent to me by my Buddy over the water and some from my Tin of Shame.  The TH clock one was originally a wishy washy beige colour when I started.  I smooshed some TH DIs Tea Dye, Gathered Twigs, Brushed Cord, and then rubbed some Treasured gold wax on top.  


The PPs are bits left over from previous layouts so Snippets...yeay!!  The corrugated card is from a package that had arrived a few days before (again inked with some DIs as above.

I put the little birdies on top as a nod to the pair of seagulls we kept seeing on Guernsey where we got engaged.  Now THAT is another story and why there are two seagulls in our bathroom!!
Now the flowers.  The one at the bottom of the clock and the others like it are NBUS and by Prima.  I only used a few as they are soooo nice.  Can you see the little seeds popping out from behind the flower towards my arm?  There are a few of these dotted around and they came out of my Happy Post I received just before Christmas, along with the sparkly heart...Thanks again my Friend.

The other flowers were made up from flowers in my stash, brads in the middle, some of which are years old, sprayed with Glimmer Mists, Perfect Pearls, layered and scrunched up. 
The MS Monarch butterflies came out of the Tin of Shame and there are others that I made using old books and my SU die.  

I wanted a little bit of watch parts in there and I saw a key somewhere when I was gathering things up so thought I would throw that into the mix too along with a NBUS TH card.  I tied the ribbon with a little bit of silver grey ribbon that was actually adorning a present my friend gave me at Christmas.  Waste not and you will want not.  Lace came from Funkie Junkie.  Only a little piece as it is too nice to use all in one go!
The leaves you can see were punched out of Snippet using my MacGill punch and inked up with DIs.

Finally I used my Cricut to die cut the  title which I cut twice to give it a bit of oomph!  Then I smooshed some more wax around and spritzed a little perfect pearls on there. 
Love the layers you can see in these last two photos.  

Hurrah!  You have made it through to the end.  Well done you.  Unless of course you skipped and just looked at the photos!  I don't mind but please leave me a comment to let me know you have been.

I am taking this over to the Playground for a ride on the swings and then cosy in front of the fire.  I am also entering this into Shopping our Stash as they are looking for old brads...mine certainly count as they are ancient!  And I will flutter past the Butterfly Challenge as there are some hexagons on my layout.   Not very often I get to link up with a few challenges!!  Woo hoo!!

Thanks for being patient.  See you all soon.

Hettie

Sunday, 2 December 2012

Funkie Junkie Tag 2 - Metal Tag

Hello Friends and Fellow Santa's Helpers!

I am back with another Tag for the Funky Junkie's 12 Tags of Christmas Challenge.  Here is Linda's Tag 2 which is the inspiration for us this time round......


Isn't it fabulous!!  Here is mine....

A bit of a manly and metallic tag this time using metal foil tape as the background and giving it a look of rivets and things.  The metal was inked with Alcoholic inks and then rubbed with wire wool.  You have NO idea how much I dislike the feel of wire wool.  You may recall this is Tim Holtz' technique for his September Tag.

This ticket I printed out a few years ago when my friend was in my craft room....it is her stamp.  I remembered it was in the bottom of my Snippet tin.  The Santa was coloured in using Distress Marker pens and a water brush.  The Snowflakes are from a grungeboard set by Mr Holtz and the gears were cut using grungeboard and a TH die, coloured with Rusty Hinge and Walnut Stain DI and embossed with Rusty Hinge Distress Embossing powder.  The top one was painted with Acrylic dabber paint.
A few little Idealogy gears, some glitter (it is Christmas after all) and some tinsel and hey presto one tag.  I may just use this idea for my Brother's Christmas card!
Thanks for calling by and don't forget you can still join in with the Challenge which is being sponsored by The Funkie Junkie Boutique.  

TTFN

Hettie

Thursday, 22 November 2012

Christmas is only ..... days away!!

Hello Friends

I am sure the Elves up in the North Pole are working flat out in readiness for The Man in the red coat to deliver lots of presents next month and much the same can be said for crafters across the globe.  I saw quite a few desks on the WOYWW hop last night with Christmas projects on them.  

I thought I would share a little something I have made this week and has been in the planning stage for quite some time.  Hope you like it..... 

Shall I let you into a secret?  This Wreath is actually old and recycled!  Yep!  The wreath is willow and I originally decorated it some 4 maybe 5 years ago when I first had my Silhouette machine and discovered Perfect Pearls!!  I cut out lots of leaves out on the Silhouette and then inked them up and sprayed them with Perfect Pearls.  I also made some wire spirals and paper beads, which I had learnt how to make the first time I went to Cornwall. 
And here you can see the wire spirals and paper beads (also recycled).  The flowers are primarily made from metal, some with chipboard bases for firmness.  Some of them are made with metal sheets left over from a project I did in Cornwall nearly 2 years ago and some of them with metal card which I had from Paperartsy when I renewed my subscription to a certain magazine (CS) some time ago.

My new TH Poinsettia dye has been used here with an extra layer at the bottom of chipboard which was covered with paper, inked and stamped.  I wanted to ensure that the poinsettia did not try to wrap itself around the willow wreath.
All the metal was inked with TH alcohol inks, stamped with various stamps, embossed with embossing folders, sanded and then layered using hot glue.  Once I was happy with the flower shape I arranged around the wreath, wrapped the wreath in ribbons, added spirals and beads which were wired in place and then set about attaching the flowers, leaves, pinecones and rosettes using my glue gun. 
Here is a SU punched flower which was actually left over from my recent Halloween Mail Box project which I added some "snow" using my Ranger paint dabber.

Some of the paper beads I used as centres to the flowers and the various snowflake buttons and elements were brought back from the US by my friend last year.  The rosettes were in my box from making them last Christmas for my Christmas Album cover.
Unfortunately these photos were taken in the house so the sheer shimmering effect cannot be appreciated in these photos.  I have sprayed the whole Wreath with Perfect Pearls Heirloom Gold mist which has given it even more shimmeriness!

Thanks for sticking with me to the end!  I hope you like my Wreath and maybe you will feel like making one yourself.  It really is quite simple though a little fiddly.  Also, be careful when using hot glue to affix the metal layers....the metal gets hot too when you push the top layer down with a finger.  Use a pencil instead! 

I am entering this wreath in to the following challenges:-

Compendium of Curiosities - Texture fades
Frilly and Funkie - Chipboard and Metal
Snippets Playground - Snippets
CC101 - Altered Metal 

TTFN

Hugs

Hettie

Wednesday, 14 November 2012

How did I miss this Challenge - Tag 9 - But I will catch UP!

Hello Friends

I was wandering around on the blogasphere recently and I came across THIS wonderful Blog which is Linda Coughlin's of The Funkie Junkie!  Wow!  I was blown away by all the loveliness on her blog and discovered that Linda hosts "The Funkie Junkie's 12 Tags of Christmas" which if you click HERE you will be taken to Tag One which has all the deets on.  It is worth just going to see all nine tags, they are gorgeous.

I know Linda is currently on Tag 9 and there are only three more to go but there is still a while to go until the Big Day itself so I guess I can give it a go.  They are sooo scrummilicious I just have to join in!  There is also a chance to win a shopping spree as these challenges are sponsored by The Funkie Junkie shop.  Let me tell you, having had a peruse and a little shop there, having recently won the CC2C Challenge, it is worth the chance to win! 

So here is Linda's tag......

Didn't I tell you it was scrummy!

Now here is my take on Linda's tag.......
Instead of stars I have used hearts made from Snippets of SU Vanilla cardstock, die cut with a Sizzix die and stamped in Barn Door with my new Wendy Vecchi stamp (in love with these and they were a steal so it would have been rude not to have bought them!).  The burlap pieces were also Snippets from my Christmas Album project.  The key was out of my jar of odd keys and watch bits (I have been told by a high authority - Mr Hettie - that it was the old key for the shed) which I coloured with black alcoholic ink, along with the mini bells hanging on the mini hearts of course!
The Holly leaves were cut out of another Snippet of SU Vanilla cardstock (I keep every piece of the SU Vanilla cardstock in a separate bag as it is great to work with), inked with Pine Needles DI, a little Fresco Snowflake paint topped with glossy accents and some Hampton Art fine glitter sprinkled over the top.  Once dried I added a little more Pine Needles around the edges.
These mini hearts were die cut with chipboard then some Ferro and Puffed Paint were smooshed over and heated with the heat gun.  Love this Ferro.  It is soo schparkly in the natural light. I crimped some wire through the crimping tool and added the bells to the hearts and wired them to the key.  I also popped two star pins into the bow, which is a Snippet of fabric my quilting friend gave to me.

The base of the tag is Kraft cardstock which I ran through the TH woodgrain embossing folder.  I painted this with the Snowflake Fresco paint and once dried added a layer of TH Rock Candy Crackle paint and once that was dried I added some Black Soot DI.

A little TH ticket and some gingham ribbon and hey presto, my tag was finished.  Now then, which one shall I do next?

You have until 17th December to catch up with all 12 tags and there is a chance to win a prize  from the sponsor Funkie Junkie  Love their goodies and to be honest, postage was not an awful lot in the context of things and pretty quick to the UK (8 days from order to parcel!).

As there are a few Snippets on this I will be linking it up to my Buddie at the Playground.

Thanks for popping by and please feel free to leave me a comment.  Gotta love comments. And finally, thank you Linda for such a wonderful Challenge, I have enjoyed making this no end, and think it will live in my kitchen.  Anyone who has been in my kitchen will know there are a collection of hearts in there!

TTFN

Hettie


Wednesday, 26 September 2012

A Reflective Piece - CC2C & Tim Holtz

Hello Friends

I thought I would share with you something I have been working on the last few evenings.  Linda over at Studio L3 has asked us to turn to page 57 of the Crafters Compendium II and make a piece of artwork using the technique on that page.  This month The Funkie Junkie Boutique are sponsoring the challenge giving away a $25 voucher.  This week's challenge happens to coincide with Tim Holtz's 12 Tags of 2012, so it is a twoferone week!!

Here is a my piece.....

A little bit bigger than a tag or card from me this time!!  The whole surround to the mirror is about 11" square.  I have been holding on to it for quite some time with the intention of covering it with paper and making an arty piece but when I saw the new Crafters Compendium with this technique I knew what I would be doing with it.  So, when I saw Linda's Challenge for this week I dug out the mirror and set to work in making this piece. 
I have added some metal embellishments  which I have collected along the way.

Including some watch pieces saved from previous projects,  some of which are real watch pieces.
And of course, some die cuts from Ranger and a rusty cockeral in the middle.  For some reason our cockeral has not quite got used to the darker mornings and is to be heard at 5am!!
I just love this little piece which I bought in Hobbycraft a month or so ago.  Wish I had bought another one now.  I love the way the light reflects on this piece but it makes it difficult to take decent photos, especially early in the morning on a dull day!


Here you can see a before and after version with the back of the mirror as it is now and the new version.  Think I like the right hand one better myself!  (Though I was finding it difficult to take a picture without my face in it....I can assure you that at this close range and first thing in the morning that would be scary!) 

Now what am I going to do with this? is a question I was asked last night by my friend.  Not sure yet.  I thought about a C gift for my nephew and his soon to be wife, but Hubby says no!  Put it in the Den and make another one for Rhys was his reply. The first is always better than subsequent ones. I did warn him that would mean another trip to the "Ishopwhichcannotbenamed" (Ikea!)!!  Hee Hee!  We shall see ey!

Thanks for popping by.  Do go and look at the lovely pieces that have been made both on the Tim Holtz Blog and Linda's.  There are some stunning pieces.  And of course, don't forget to check out the Funkie Junkie if you want/need some stash!

TTFN

Hettie

Thursday, 2 August 2012

CC2C 15 - SSS - Honeycomb Sentiment

Hello Bloggers

Before I start my post today, I just would like to say a huge Congratulations to the British Team for all their achievements in the small event which is taking place over here called the Olympics.  You have all done a wonderful job regardless of whether you have achieved medals.  Well done boys and girls.  You are doing the country proud!  I have never enjoyed an Olympic event so much as I am this time. It may be possibly due to it all taking place in sociable hours!

Right, little ramble over, now I want to show you my latest piece of work for the Lovely Linda’s Compendium of Curiosities II Challenge as well as the Simon Says Stamp for this week.

Linda has asked us to turn to Tim Holtz’s book II at page 56 and make a piece using that technique.  As it happens, I had recently bought a new set of embossing folders which were dying to break free of the packaging and on Tuesday a new stamp arrived, which I had ordered.  So an idea was born to create this……  
The background was inked using Distress Inks (Wild Honey, Forest Moss, Rusty Hinge and Brushed Corduroy), spritzed with a little water and then stamped with a flurry of stamps (Hero Arts, Penny Black, Paperartsy, Blade Rubber).  The background for the sentiment was inked up and again spritzed, the sentiment stamped with Archival (coffee) and then embossed with clear embossing powder.

My Bees were stamped onto grungepaper using black Archival ink, embossed with clear embossing powder.  The bodies were coloured using Distress markers (Wild Honey) and the wings were painted using Pearl Perfect Pearls and waterbrush.   When I got home from work last night, Hubby had been decanting our first crop of honey into jars during the afternoon.  Mmmmmn!  Beautiful Honey on toast!  Perhaps that is why I love using these Bee stamps so much! 

I mounted the black cardstock onto canvas board, a little washi tape around the edge and then layered all the elements on top, punched hanging holes using Crop a dile and then wired the hanger, and added a little fluff to the wires and applied a liberal amount of Gold Glimmer Mist over the whole piece.  (Well!  Team GB did get two lovely gold medals yesterday didn't we!)

Simon Says Stamp is looking for sentiments so I am entering this piece in there too. 

Thanks for looking and please sign in to the Visitor’s Book so I know you have been.  Gotta love comments!

TTFN

Hettie