Showing posts with label yellow. Show all posts

Wednesday, 4 September 2013

Lesley's Birthday Card


Hello Buddies

Gosh!  Wednesday already!!  How did that happen?  Happy Hump Day Everyone.

Today I thought I would share a card I made for a friend of mine last week.  It seems very apt colourwise for the Autumn kinda day we are having today.  Lesley is a fan of oranges and yellows hence the colourway.

It was made using a Sweet Poppy stencil, first colouring it with DIs then removing the stencil to dry the inks before repositioning it carefully and using clear paste as you normally do.  
Once you have lifted the stencil VERY carefully, without dropping or smudging it and carefully placing it into a handy bowl of water, get your clear fine microbeads and pour them over.  These microbeads are swines terrible for getting everywhere!  I mean everywhere.   Leave to dry overnight WITHOUT picking at it to see if they are dry yet.  
But the effect is awesome!  Especially in the sunshine.  Top tip - do all your edges etc before you attach the beads cos the little blighters beads get in your punches!
The finishing touches were added, a strip of Snippet card punched with EK Success punch, another piece layered on top.  Punched butterflies - again using Snippets, and some fluff.  The Friends sentiment was kindly sent to me some time ago.  Voila - pwetty card finished and Lesley LOVES it!

Thanks for calling by.  Isn't it nice to see the little kiddiewinks going back to school!!  Though I wish more peeps would walk their kids to school to prevent the queues!

TTFN

Hettie

Tuesday, 18 September 2012

First Day at School....Scrapbook Layout

Hello Friends


A week or so ago I watched a video by Donna Arkle where she demonstrated the use of spray inks to transform plain white paper into beautiful multicoloured papers.  Donna used the backs of papers in her stash and Dylusions inks.  Not (yet) having Dylusions inks why not use my Colourwash sprays?  So armed with some music in my player, some paper stash which I have had for eons and never use, my Colourwash sprays, a spray bottle of water  and all the mini  mister sprays with all sorts of colours used for previous projects....oh! and a glass of wine, I set about spending a happy evening spraying.  


Oh what fun it was and totally liberating.  I highly recommend it as some of the results are gorgeous and I am really pleased with.  This one screamed school photo at me.  Possibly because my school badge was blue and red, and my uniform was navy blue with red, yellow, white or pale blue shirts or jumpers.  


I used my white embossing powder and a new Papermania ruler stamp to stamp the background. Then removing the stamp from the block I inked it again with Black Soot and "rolled" the stamp in order to get little bits of stamping on there (no idea what the technical term is but I am sure you get my drift).  These two photos hopefully show you what I mean.


I also splattered some yellow acrylic paint on the background before adding the papers and other elements.


I added some Papermania sheets from Boofle collection and the Portobello Road collections along with a yellow mat for the photo. 

Using the Silhouette I printed and cut the Boy, Girl and School Flashcards, the First Day bingo card and the Listening Watching Learning tab.

Some rub-ons with red brads were the final touch and that meant quite a few bits have been used up!  

I hope you like what I have shown you today and feel inspired to give your spray inks a new lease of life.  

Thanks for popping by and please don't forget to sign in the Visitors Book

TTFN

Hettie

P.S. This is my niece and nephew - twins!!

Wednesday, 29 August 2012

Scrapbook Layout - ATS - Flowers - Megan


Hello Friends

I can call you a Friend can't I?  We are all friends here aren't we?

The lovely peeps over at ATS (Addicted to Stamps) have asked us to use Flowers as our topic for this month's Scrapbook Layout.  With this in mind I set off to hunt down a particular photograph which needed scrapbooking.  However, as luck would have it I could not find it.  But....fear not!  I came across this photograph of my youngest niece (24 next month and a professional dancer/choreographer - how did that happen?), which photograph also was in need of scrapbooking.  

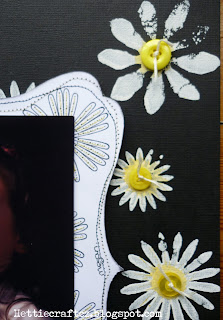
I first cut out some Daisies and the spikey flower from the Tattered Florals dies, both from Sizzix, using funky foam.  I placed them in turn on my sticky block and using TH acrylic paint I stamped the whole background with flowers and set the cardstock aside to dry.
Whilst the background piece was drying I cut a white shaped piece using my Silhouette cutter (I know there is a name for this kind of shape but I cannot remember it now) and then stamped and embossed flowers using my Mixed Bunch stamp from Stampin Up.  Then the fun began.  I took my pokey tool, using the dots on the flowers as guide, I poked holes ready for me to stitch through with some embroidery thread. Yep! this took a while.  Nine flowers and 24 petals per flower.  Once I had completed this I went around the edge using my sewing machine, first with black thread and then again with yellow thread.  Finally I gently distressed the edge and inked with Black Soot DI.
.
I knew that this TH stamp would fit the bill for a title so I cut out the shape from a Sizzix die, stamped the flowers using Archival ink and set to dry.  I then stamped giggle using Archival ink and embossed with clear embossing powder.  Then I took my Mustard Seed DI and painted the flowers using a water brush.  Once this was all dry I faux stitched the edge with a black pen and inked the edge with Black Soot and popped a threaded button on the left.
Using a piece of Snippets card, I stamped three flowers to match the flowers on the white paper, punched them out and swiped two of the flowers with Mustard Seed DS.  I then cut down each petal on the white and one yellow flowers.  Then, using a kebab stick (very useful craft tool - thanks Hels for that tip!) I curled every other petal in towards the centre of the flower, layered all three flowers and fastened together with a brad, adhering the layered flower to the bottom left of the photograph.  
Here you can see some of the painted flowers in detail.  Once the white paint had dried I took my Mustard Seed DS and just "splodged" the DS into the centre of each flower.  I did not want a defined line and wanted it to look natural.  Whilst the DS was wet you could see where droplets had flicked onto the black cardstock, but you could not see this once it had dried!
Again, using Snippets, I had a rummage in the lace tin and found a perfect sized piece of lace to place across the layout, I cut some "lace" using the TH Sizzlitt die and after another rummage in the ribbon tin, found just the right sized piece of black rik rak which I layered and fastened with staples.

The final touch was to thread some buttons and attach the same to the middles of the flowers.  

I hope you like and feel inspired to make a layout of your own to join in the Challenge.  I certainly enjoyed doing this layout even if it did take nearly all day to complete.  Well, what else do you do on a wet miserable Bank Holiday Monday?

Thanks for looking and thanks also to my lovely new Followers Lynne, Louise and Barbara.  

TTFN

Hettie

Wednesday, 1 August 2012

Typically British - Blog Hop!

Hello Peeps

Thank you for popping by to see me on this British Blog Hop which has been organised by Nicola of Sunshine Reflections.  If you want more details please click HERE or click on the Union Jack on my sidebar.  The Schedule is:-


 August 1st

Sam (Hettie - me)

If you have got to Sam (Hettie - me) and you haven't been to see the other peeps, please feel free to go back to the beginning and see me again on the way around.

Well, I had to have a think about this project to share with you.  The theme is British and what can be more British than a good ole' cuppa tea.......

I was lucky enough to spend the afternoon of my birthday last month, with my lovely Cousin Tracey at The Ritz having a special Birthday Tea!  
Some Bunting for Celebrations made with my Stampin Up punch.  "Everything stops for..." was cut on my Silhouette.  The papers are all MME and the whole layout is shimmering with Gold Glimmer Mist to reflect the opulence of The Ritz.  
The famous shot of the side of The Ritz and inside the famous Palm Court.  Our table is the one to the left of the Waiter here.
Boy we were "full as eggs" once we had eaten our tea.  This is one Birthday I shall never forget.  The clock is from an Inkadinkado stamp.  The large blue "ribbon" was distressed, inked and run through the ribbler.
A great photograph of the two of us having just had our tea. 
Here are the top two plates of our tea tray.  The bottom plate had our sandwiches on. No crusts of course!

Right then.  Thanks for visiting and I hope you like my take on the British theme. Now off to HERE next to visit Angela.  Don't forget to go and visit the other ladies tomorrow for Day 2.  They are:-

August 2nd

Thanks Nicola for organising this Blog Hop.  It certainly has been fun taking part and great to see other folks' work.   It is such a good year for all things British too!


TTFN


Hettie