Happy Friday Crafters!!
Ooo! It feels soooo good that it is Friday evening and great that I have a fabby weekend lined up. So I shall start my weekend by sharing with you my Grungy Monday Challenge for this week.
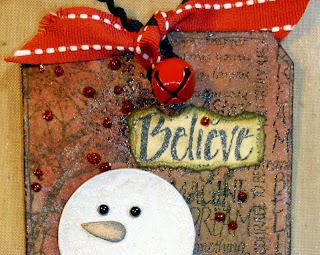
This week the Lovely Linda sent us HERE to view the Master of the Distress Kingdom T!m Holtz showing us how to get schparkly with Rock Candy Crackle Paint and Rock Candy Distress Stickles. How could I resist the idea of a Snowman? So here he is - my first Snowman of 2011.....
Boy have I used a plethora of Ranger goodies to make this tag. I first of all used the lovely Tag die to make a Tag. I then used DIs in Fired Brick, Red Barn, Peeled Paint and Forest Moss which I inked on my craft mat before spraying with some water using my Mini Mister. I then swooshed the tag through the lovely inkey stuff on my mat and I heat dried it after each swoosh. Whilst I was trying to find a mini mister with just water in I came across one with well I don't know quite what in the mini mister but I think it was water with Kiwi Perfect Pearls in!! I knew with all the schparkliness it would look good whatever colour it was!! I wasn't disappointed let me tell you.
Once that was all dried (and ironed!) I went about making Mr Snowman. I used the Sizzix Snoman die and chipboard (recycled of course). Then I painted all the fiddly little bits with Snow Cap (of course!!) Acrylic Paint. Once dried I painted the main body with Rock Candy Distress Crackle paint and the fiddley bits with DIs Barn Door, Vintage Photo, Dried Marigold and Black Soot. I ran Mr Snowman's scarf through the Big Shot with an embossing folder and then inked the edges of all pieces (except the buttons and eyes) with Black Soot before covering them with Rock Candy Distress Stickles.
Once Mr Snowman's body was dried I rubbed DI Weathered Wood into the cracks but not too heavily and then started to put Mr Snowman together using Glossy Accents. The eyes and buttons, once they were adhered I used Black Enamel over the top to make them 3D and bright and shiny.
Whilst Mr Snowman was drying I turned my attention to the tag. I stamped a Penny Black branch stamp with DI Forest Moss on the top left and dried the tag. I then used the Believe stamp from Crafty Individuals using DI Black Soot and embossed with clear embossing powder. I then stamped part of the stamp again on a piece of cream card and again embossed it. I tore the Believe word, applied DI Pumice Stone and distressed the edge with Forest Moss and placed over the stamped image. A little bit of ribbon and a bellat the top, a little washi tape and baker's twine at the bottom of the tag and I was ready to adhere Mr Snowman using foam and then a few red Stickles for berries.
One happy Mr Snowman I think!!
Please let me know what you think of Mr Snowman - I am sure he would love to hear from you!! And don't forget you can visit Mr T!m Holtz HERE for more ideas and inspiration!
Have a great crafting weekend!
TTFN
Hettie


3 comments:
Hey Sam, I think your tag is fab. I love all the details and the processes you used, very helpful. Great Job!
I've got a confession ... I understood all that! I've been reading up. I love the tag, even more so, now that I understand the work that went into it.
Brilliant tag!
Hugs, Sandra
Post a Comment