Showing posts with label tutorial. Show all posts

Thursday, 6 March 2014

Silhouette Mat Replacing Tutorial, Home Made Stencils and Cards......

Hello Friends

Before I start I would like to thank my latest followers Denise and Princess Judy.  Thank you both for following me and I hope you enjoy the ride!  You might want to get yourselves a cuppa before reading today's post.

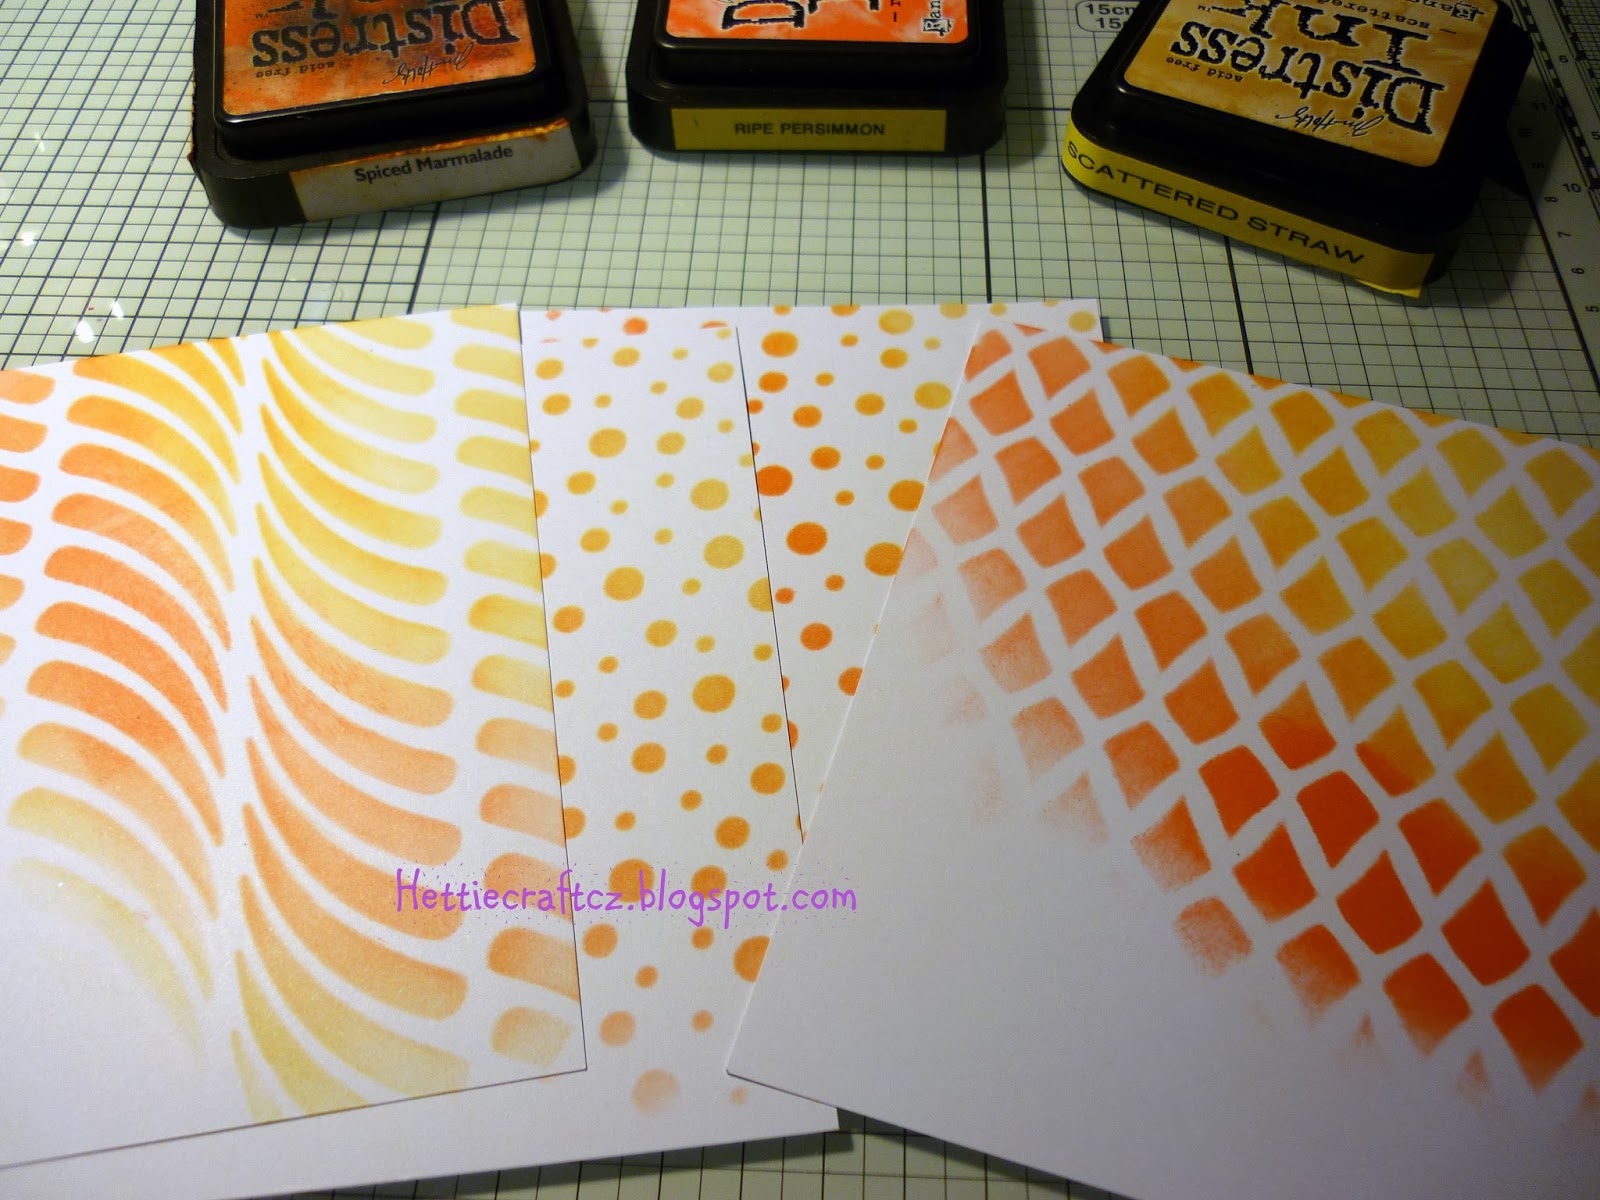
This is a project I was doing just before I fell ill but haven't got round to sharing it with you.  I joined an online class for stencilling - something which I have dabbled in but I don't use them a lot.  The online class is available after the class finishes so I can dip in and out of the course when I feel like (just as well as I fell ill at the start) and it is kept there ad infinitum.  

My choice of stencils is limited, hence why I don't use them an awful lot and I had a brainwave! (Yes it hurt!) I have template plastic (VOS) for creating quilting stencils.  Would it cut on my Silhouette?  Sounds simple doesn't it?  However my cutting mat for my stencil was naff not very good and I wanted to do this there and then.  Also, the mats have become very hard to source and very expensive since I first had my Silhouette.


So I took a sheet of laminating plastic and laminated it.  Took another sheet of laminating plastic and laminated it with the first laminated sheet inside it.  Are you with me?  Then I placed some masking tape down the long edges of the "mat" about 1/4" in.   
Then I took my Crafters Companion Stick and Spray Temporary glue. (We don't want it sticking there forever do we?)  Something else I bought ages ago and have not used much!  

I then sprayed the mat lightly, covering the surrounding area first, with about 5 thin coats.  I then removed the masking tape and replaced it.  These are where the wheels move the mat along the cutter, so you don't want them tacky.

To protect the mat between uses I took some freezer paper and cut a piece to fit and use it shiny side down.
Then I downloaded a design from Silhouette, placed some template plastic on the mat and watched with baited breath to see if the plastic would cut.
I need not have worried.  It cut like a hot knife through butter and the mat did it's job perfectly.  This design is called "Kite".

Here are some samples I made using just three colours of DI.
And some finished cards....


I used some Snippets of vellum, cut some tags (the snippets dictated that some of the tags are shorter than others), tied some twine and adhered them to the card using a teeny bit of glue behind the twine and another behind the butterfly.

Overall I was extremely pleased with the mat and the stencil.  So much so I went online to a very well known auction site and ordered some A4 template plastic so I could make some larger stencils.  All this came with a bonus - all the materials were already in my craft room.  I love it when two crafts collide (template plastic and freezer paper both being quilting tools).

Whilst I don't suppose Silhouette would advocate making your own mats, when they are getting like hen's teeth to get hold of then what are we supposed to do?  If you decide to try this, do so with caution.  I am no expert and will not be held responsible for any mishaps.

Thanks for calling by.  Sorry it is a little long today but I wanted to show you how I created these stencils. Please let me know what you think!

Hettie    

Tuesday, 15 October 2013

Tickets Please.....


Hello Peeps

Tee Hee! I now know what "Peeps" are for my friends across the water - nom nom nom!

Some of you know that I went to London on Saturday with some friends to take part in a Day School for Scottish Dancing.  We went up by train so I made us little folders to put our tickets in and keep them safe.  All made from Snippets so I can join in the merriment of the Playground with these.  I got the idea and pattern from another Playground Buddy right HERE.

I have been on a bit of a rollercoaster the last few days so I have not been able to keep up with my blogging visits but I hope to rectify that over the next few days and play catch up.  

Firstly Mr Hettie and I were trying to finish decorating the Guest Room as we had some VIP Peeps coming to stay, then I went to London very early on Saturday and came home very late thanks to some kind children who I will throttle if I find out who they are having placed pebbles on the track made the train over two hours late and then it was down to Cardiff to meet with my Blogging Buddy Kim and Mr Kim!  We have got on like we have known each other for years and it was sad when Kim and Mr Kim left earlier today.

Thanks for calling by and see y'all very soon!

Hettie

Tuesday, 28 May 2013

Scrapbooking Tuesday - Tutorial - Storing Thin Dies - 500th Post!

Hello Friends

Blinkin' 'eck Peeps!  When I went to write yesterday's post up I realised that my next post (i.e. today's) was going to be my 500th post on this here Blog!  Wow!  I cannot believe that so many of you have tuned in to my Blog (that is an old saying isn't it!) and read my waffles.  So Thank You to everyone who visits me.  Also, a huge Thank You to my Followers, including my very newest one, Karen.  If you didn't follow me, then I would not post here!  Hmmn!  Not sure that quite sounds right!

Well, it is Tuesday today and as most of you know, I usually do a scrapbooking post today.  However, I thought I would kinda twist this slightly and show you how I am have now turned an old safety deposit box into a storage box for my thin dies.


I don't know how you store all your thin dies, but mine were growing quite rapidly and because of the different boxes they all come in, I had them dotted around my room in various boxes, drawers and baskets, which was not good.  If I wanted to take them anywhere I had to remember where they all were and then try and pack them carefully.  I needed a good solution.  


So I emptied this tin of the lace it was holding, bought some magnetic sheets (A4) and cut them in half and popped them into the said tin.  Eureka I thought!!  However, when trying to lift the sheets they would bend and then some dies would come loose.  I needed them to be stiffened! (Don't be rude now! No viagra involved here!)


So then my album making skills came into use.  I cut some chipboard to the required size (taking into account the lock at the front of the tin!!  


Covered them with scrapbooking papers that have lain in drawers for a loooooong time and/or were in my Snippets box.  Then rounded the corners off with my corner rounderer.

I made some tags with my Memory Keepers tag punch, scoring and folding the card and cutting them out with the punch just below the top blade so they would be folded.


This way they would fold over the top of the "page" instead of having to adhere two separate tags together.  Then using the clear stickers that came with the punch I adhered the tags to the top of the "pages".  Red is Sizzix, Black if Paperartsy, Purple is Spellbinders, Turquoise is Memory Box and Blue is Quickutz.  Other dies also available!

I rounded off the magnetic sheets, again using the corner rounderer.

Then using hi tac redline adhesive I adhered the magnetic sheet to the "page.SHINY SIDE UP!

Tee Hee.  This sheet is so shiny I can see my reflection!


Then the task of placing my dies to the pages.  


And here are the pages in the box.  The tape you can see in the top is also magnetic and came out of the DVD type boxes I bought as a potential solution.  By adhering these to the top of the tin, I can just place the dies on there as I am using them ready to be put back once I have finished which means I don't play that "where did that die go" game in amongst the papers as you are using them!

You will notice that I have placed tags on the top left with the die numbers on for easy reference (and avoiding duplicate buying).  Next time I get my dies out and use them, I will cut extras and place on the pages for easy reference too.

All I need to do now is to decorate the box.  That is another project for the future!

I do hope this has given you an idea for your die storage.  I will share with you the fact that before I went to the trouble of covering the pages, I did cut the chipboard and place between the sheets a few weeks ago to check I was going to be happy with this idea first!  Having bought DVD cases and magnetic tape which did not work for me (they kept coming unstuck and flipping to the opposite page) I wanted to make sure I was happy with my idea first!

Thank you for calling by.  I shall pop this over to the Playground as there are lots of Snippets used here (and I am desperate for the SD stamps on offer this week in the draw), as well as recycling the tin which was destined for the bin in work, so is a kinda Snippet!  I keep hoping I can find more of these tins, but a load were binned not long before I started!  Typical!

Hugs

Hettie


Sunday, 17 April 2011

Tutorial - Stamp Book

Good Afternoon Crafters!
What a beautiful day it is here.  It is almost criminal that I am sat in my Craft Room writing up this post, but I promised to give you a tutorial on my Stamp Books, and I am not one to break a promise, especially when it comes to one of a crafting nature.
Are you with me and are you ready to go?  Then I will begin.
You will remember I gave you a bit of a list HERE so I will not bore you with that again and will get straight in to the how to.
Firstly, you need to cut the covers out of the chipboard.  I am making a Stamp Book which will hold my unmounted rubber stamps, as I have been naughty this week and ordered some lush stamps from Crafty Individuals and as I already have a few, I could do with a book dedicated to Crafty Individuals.  So I measured the A5 zip folders which I have purchased from Rymans and they measure 7" x 9 1/2", however, I have bought some of these folders in the past which measured 10" so, in the interests of interchanging my folders, I have cut the chipboard at 7 1/2" x 10 1/2".


If you are making covers to fit either the Tim Holtz stamp sheets or replacement folders, these measure 7" x 8 1/2" thus the covers I usually cut for these measure 7 1/2" x 9". 
If you are using any other stamp sheets e.g. Wendy Vecchi, then I suggest that you add 1/2" onto the size of the sheets for the covers.
Please TAKE CARE when cutting the covers as I don't want to hear of any blood being spilt in the name of art.  I have Winnie the Pooh plasters in my room but it would be tricky for me to administer them for you.

When choosing papers to cover the chipboard, be aware if you are using stripes or definite patterns that you do not inadvertently place chipboard upside down.  I tend to use a heavy paper/cardstock to make covers as the book will need to withstand a fair amount of usage, being taken to crops and being pushed and pulled in and out of shelves in your craft space.  I am using My Mind's Eye Washing Line papers for the outside covers and plain cardstock for the inside.  This is because I really love these papers and tend to stroke them, it will be lovely to see these papers in years to come still being used.  Plain cardstock for the inside as I like to stamp the insides with stamps that are being kept in the book.  After all, it is a stamp book!
Once cut, double check your measurements rather than wait until later, to ensure that the covers are the correct size.   If any of the edges are rough you can smooth them using sanding block or files, whichever is your tool of choice.


Using the papers you have chosen for the outside covers  apply your adhesive of choice to the chipboard (I previously used mod podge, but will be using Christine Hellmuth matte medium in future lurve this stuff!!).   Now do not be tempted to put a lot of adhesive on the chipboard, you do not want to soak the chipboard, else you risk making the paper wrinkled.  However, please make sure that there is enough adhesive on the edges of the book so that the paper doesn't peel later. 
Once the paper and chipboard cover are together, I use a brayer to try to ensure the paper has been pressed down and avoid any air bubbles being caught under the paper.  Also, be careful that if you are using a patterned paper with stripes, that you have put the paper on straight, and also, not upside down.
You will now need to leave to dry.  Be patient.  I usually leave this overnight to give it plenty of time.

Morning!!  Next trim the excess paper from your covers.  BE CAREFUL not to cut yourself.  Whether you use a metal ruler or just the edge of the covers to guide you is up to you.  If you do not cut flush with the edge of the covers, do not panic as we can file it down later. 

Keep all the excess bits, as we can use these to decorate the cover and also make the "closure".
Check that the edges of the cover have been adhered, if not use a little of the adhesive (here you can use the tiny Christine Hellmuth matte medium to "inject" the adhesive in). 

Sand the edges if you need to, to ensure that the paper is flush with the chipboard.  Hold the sander/file at an angle 45 degrees, holding the paper side towards you and file away from you avoiding any sawing action.


Now is the time to think about how you are going to close the book.  I tend to make a "flower" using cuttlebug flowers and ribbon, but I have also used a button (see the Christmas book on THIS post). 


To do this, measure the centre of the back cover (reverse side) and about an inch in from the edge (don't forget to check that it is not going to upside down with the paper) and make a mark, on both the front and reverse covers. 


At these marks, using the largest hole on the Cropadile, make a hole.  On the reverse cover attach a large eyelet and thread a piece of ribbon leaving about 1 1/2" on the inside.  Adhere a small piece of masking tape catching this ribbon so that it cannot be pulled through. 


Burnish this masking tape and ribbon in order to flatten it.  Being careful not to get glue onto the ribbon, adhere the remaining cardstock onto the inside covers (use brayer).  Try and avoid getting any adhesive on any part of the cover where you do not want adhesive to show (this is where the matte medium is sooooo cool!). If your covers became a little curved when you adhered the front covers on initially, layer the covers with some sheets of plastic and place a weight on top and let them dry - again overnight is best.

Now onto the front cover. I will show you how I make the flower but you can make yours any which way you choose. I make a cuttlebug flower using four layers.


Ink the edges and make a hole in the centre for the brad. Ensure that the brad has long "legs" so that it cannot be pulled through easily. Place each layer of the flower in your hand separately, and push your thumb into the centre so that the edges curl a little. (I don't have the posh tools for this!)  Layer the flower and push the brad through the flower then attach the flower by pushing the brad through the hole in the front cover and separating the legs at the back of the cover.
  
Now the inside covers are dry, cut the excess cardstock off (avoiding cutting the ribbon in error!) and again file/sand the edges if necessary to ensure the cardstock is flush with the chipboard.  Mark out where the holes are going to be for the rings, using the stamp sheet or if you are making a zip file version mark where you choose.  Using the largest hole on your Cropadile, make the holes, again, checking you have the covers the right way round!

Ink the edges of the covers or use Krylon pen, whichever you prefer.


If you are making a book based on the Tim Holtz stamp sheets/replacement sheets, you may wish to round the corners before inking with a corner rounder.  As my zip files are very much squared off I decided not to.


 In the case of the zip files, use the covers to mark out where you are putting the rings.  As I want my folders to be interchangeable I used a zip file out of my current book as a guide. 


Don't worry if you can see on the inside of the covers, where you have attached the brad and ribbon for the closure, a little strategically placed die cut/sticker will hide this!! 


Assemble your book with the rings, stamp sheets and then here comes the fun bit.  You can decorate away on the covers to your heart's content. 


Have fun.
I am going to decorate mine during the week, and will show you what I have done next weekend.
Please leave me a comment with a link to your blog so that I can see what you have all done when you have completed your book, and I hope you have enjoyed making this stamp book with me. 
May you have lots of fun using this stamp book over the next few years.
Don't forget to leave me a comment so that I know you have been.
Happy Crafting
Hugs
Hettie


Tuesday, 12 April 2011

Mandy's Birthday Card

Hello there Peeps

I hope it has been a lovely day today wherever in the country you are. It has certainly been a lovely day here in the Brecon Beacons, though not as warm as it was on the weekend.  I even spent a happy few hours in my Craft Room, with my feet up under the desk.  Those Really Useful Boxes certainly do live up to their name!!  LOL!!

I thought I might show you the card which I made for my Buddy Mandy, whose birthday it was on Sunday and who visited me yesterday.  I have her permission to show you her card, though I wanted to make sure she had recieved it before I showed you, in case she saw it on here.

I made this card using the technique which we followed for the Grungy Monday last week.  A technique which I really liked and which will no doubt appear on some more projects in the future.  If you click HERE you will be whisked by Broomstick to my post which links you to the video by Sir Tim Holtz himself where he shows you how it is done. 

Here is what I did to make this card.  First I cut out with my Tattered Florals a set of stamps using funky foam.

I then swooshed some Claudine Hellmuth medium onto my craft sheet and run the stamps through the medium, (after putting them on a block first of course!)  Then I stamped the foam stamps coated with medium onto a piece of patterned K & Co paper and left the medium to dry whilst I cleaned the medium off my stamps and craft mat before it dried on there.  Don't want that now do we? (I only used three flowers, not the diddy one!)
Once the medium had dried on the paper I started to apply DIs to the paper. 
Once I was happy with the colour I splashed some  droplets of water on the paper and left that to dry.    Once dry I took a cloth and rubbed any excess ink off the resist on the paper.  Then I put a mask on the piece of paper and with the Perfict Pearls mist I sprayed to give the card another layer which shines lovely in the changing light. 

I took another piece of plain paper and applied DIs to both sides of that, again splashing droplets of water on it and left that to dry.  This was to make small flowers to decorate the final card and also to stamp the sentiment onto to attach to the front of the card.  

Then I used some navy card to make mounts for the main piece of patterned paper and the sentiment, and after edging the patterned paper with some ink I adhered the patterned paper to the mounts, wrapped ribbon around the larger piece and tied a knot, attached the sentiment using foam pads and then cut out lots of the smallest flowers on the Tattered Florals die.  I inked the edges of these flowers, fluffed 'em to make them look like flowers and attached with glossy accents.  I popped assortes sizes of glittery spots in centre, adhered the remaining three flowers inside and stamped message inside and hey presto!  one happy birthday card.
Hope you like and has given you some ideas for your cards.

Hettie.

Ingredients:
Ranger - DIPeeled paint, weathered wood, faded jeans, mustard seek; glossy accents; sentiment from Natures Moments; ink applicator; cardstock and bazzill;  flower centres QVC; ribbon.

Sunday, 10 April 2011

Would anyone like to make a Stamp Book with me?

Good evening Crafters

What a glorious weekend, weatherwise, we have had.  I hope you all had a good time at Ally Pally, those of you who were able to go.  I am not jealous at all, not, not, not!!  I will be there at the next one, have no fear!!

I mentioned on WOYWW last Wednesday that I would put a tutorial on here as to how I made my Stamp Book which was on my desk in the photo.
I have had a few responses from people wishing to make one, so I am letting you have a requirements list tonight and I will give you until next weekend to gather your bits so that we can make one together next weekend.  By then the weather is allegedly going to be cold again so you won't be wanting to go outside anyway!!

Here is the first book I made some two years ago....
 As you can see it was made to house my Tim Holtz stamps because I had bought this stamp set....
and I did not have anywhere to keep the stamps safely once the packet had been opened.  My collection of acrylic stamps at that time were being kept in a basket and sometimes  they would slip and slide all over the place when I was rummaging through the basket looking for a particular one.   It was time to sort the problem out!!
After the initial book I went on to make several more, (that paper set above was one of my favourites! I have a few sheets left for that something special project!!!), including a Christmas one ....

and one which I adapted in order that I could hold unmounted stamps in it, which is now getting a little full, so I may just make a new one specifically for my Paperartsy stamps.
 
 
At least with this method of storage, it is pretty easy to make a new book when the current books are full!!! 


Requirements List:-
Thick chipboard - I use a wonderful chipboard which is about 3mm thick and which I buy from The Art Shop in Abergavenny.  Despite its thickness it cuts beautifully with a rotary cutter and can withstand a fair bit of bashing and carting to crops.  The Art Shop will soon have an online shop but in the meantime, if you cannot get to Abergavenny, you can usually pick up chipboard from shops such as Hobbycraft and other good art shops.
Bookrings 2" - three if you are using Tim Holtz stamp sheets or otherwise possibly four.
Unmounted stamp sheets/folders - If you are using the Ranger stamp sheets you can buy them here (amongst other places).  If you are using zip folders (as in my last book) they are usually available at Ryman or W H Smith. 
4 sheets of heavyweight Paper/cardstock - this binder is going to take quite a bashing so use a good heavy quality paper to avoid it getting ripped and torn too quickly.
Wet glue - mod podge or Christine Helmuth medium (love this stuff), you can buy it here.
Brayer - makes it easier to adhere the glue.
Corner rounder - if you like your corners rounded.
Cropadile - gonna need to make large holes.
Large eyelet - so you can thread your ribbon through without tearing the chipboard cover.
Large pronged brad or a button with a shank on to make the closure.
12" piece of ribbon - not too thick, say 1/2" width, to make closure.
Masking tape.
Selection of matching ribbons/fibres  -to decorate rings.
Sandpaper.
Ink/krylon pen - to ink the edges.
Embelishments - time to have fun!!  The world is your oyster!!
Foam pads.

This list is not exhaustive, and I am sure that something or other will have been left off but do not panic!!

Please let me know if you wish to join in with making yourself a little stamp book with me.  I will hopefully have a new set of Wendy Vecchi stamps to make a new book for by the end of the week, however, I will give you full measurements/allowances on the way and you can always e-mail me if you are not sure what size you need to make your book. 

Happy Crafting.

Hettie

Please note I am not being sponsored by any store to promote them.  I have just put links to stores to make it easy for you to know where you can purchase the parts.  You are, of course, free to use a store of your choosing.