Showing posts with label Ranger. Show all posts

Monday, 8 February 2016

Happy Birthday Tracey....

Hello My Lovely Friends

I do hope you are all coping with this terrible weather we are having right now!  I drove down to Cardiff today with my friend (needed to do a reccy on my new place of work - did I tell you I have a new job?, and we popped to Ikea too!!) and the car did have a few scary moments when the wind buffeted it.  In the days when the old rear engined Skodas were the car of choice in our family, my MIL used to carry a bag of coal in the boot on days like this.  I wished I had one in my boot today!!

Anyway, enough chat, I know you wanna see what I have been up to recently!!  This card wasn't done too recently, but it is one I have not shared before.  Hope you like it...

I used my lully Penny Black poppy stamp, inked with Ranger Archival ink and then coloured in using my watercolour pencils.  Then using my TH text stamp, I made a mask of the poppy and then stamped using DI and inked around the image before mounting it onto some red card. 
This was then layered onto some left over hessian (or burlap to my US friends),  then some Papermania pp and some more red card before putting it onto the kraft card.  
Some buttons along the top and ribbon and hey presto a card was born.  

The hessian and red card were from the vast Snippets collection so I am running with my lead boots over to the Snippets Playground ready to take part in the cookery lesson and subsequent pancake race tomorrow!!  There is talk of chocolate spread, but I am an old fashioned gal who likes the lemon juice, currants and sprinkled sugar with cinnamon.  Who is with me?

Thanks for calling by.  

Hettie 

Friday, 18 January 2013

Nature is Unique..

Hello Friends

For those of you who visited my desk this week you will know that I had a layout on there that I was working on so without further ado here it is.....

The photo is of one of Hubby's Bees who was out for a beautiful early February day two years ago enjoying the sweet nectar of Snowdrops.
I started this layout with a sheet of plain creamy yellow cardstock which I sprayed with Ranger Colourwash in Lettuce, Terracotta and Pesto whilst using Heidi Swap, Tim Holtz and Crafters Workshop masks.  I sprayed the colourwash in sections and then unscrewed the spray part, removed the tube and then flicked the ink to get some small splodges.  Well, gotta get inkey haven't we?  The flourish stamp here is from Crafty Individuals and most papers used are 6x6" My Mind's Eye - Tangerine. 

I stamped up a new stamp which I bought from Ebay and unfortunately there is no makers name on it.  I inked it with Archival, embossed with embossing powder and coloured it in with Copics.  The bakers twine is Stampin Up and finished with a little button from my jar. 
I cut the "Nature" letters using my Cricut and Quickutz self adhesive paper (cuts like a dream, glad I rediscovered it).  I went around the edge of the letters with Forest Moss Distress Marker to make them pop as well as stamping them with Stayzon Forest using a Hero Arts flourish stamp.  The word "Is" was made using Grungeboard letters adhered onto a grungeboard block which I adhered then painted with Paperartsy Fresco in Snowdrop,  with colourwash and flicked again then a little Adirondak Lettuce.
The Unique was stamped with A Lettuce again and embossed with embossing powder and trimmed then flicked with Colourwash and edged with A L.    The Stampotique Bees were stamped with Archival ink and embossed with embossing powder.  They were coloured with Wild Honey Distress Marker and an embossing pen was applied to the wings along with some Pearl Perfect Pearls.
I used the lace mask from TH which has given the effect of a crown at the bottom of the page. I will have to remember that for future projects!  I added some lace and Stamping Up bunting below the photo too. On the pink strip of paper you can see a little of a Pink Paislee stamp and the shimmer of the bee's wings.
The layout came a sketch from Liz Chidester of thescrappiest blogspot - so thanks Liz.  I really liked this one and hope you do too. I am linking this up with Simon Says Stamp - Lace, Facebook CC101 - spray ink, as well as the Snippets Playground.  Here is the Sketch....

Thanks for reading all the way to the end and hope you like.  I look forward to receiving your comments.

Have a great snowy weekend and please be careful.  Do heed the advice of the Police and other bodies of only going out if necessary.  

Hugs

Hettie

Sunday, 6 January 2013

Happy Birthday Tim....

Hello Friends

Over at Studio L3 Linda has asked us to make a card for Tim Holtz whose birthday it is tomorrow, using any technique or products we choose.  So in honour of Tim's Birthday tomorrow, here is mine....

The main image is an Artistic Outpost stamp and I chose it knowing that Tim is a fan of anything antique as this is certainly an old image.  I also love the saying up the side of the card as playing with inky things is fun and yep....fun is good!

The background paper is a Papermania pad I have had for sometime and the houses across the bottom is one of Ranger's on-the-edge dies.  The background of the stamped image is made from a piece of cardstock which had been in the bottom of my spray box.  I place plain cardstock in an old pizza box which I use as a spray box and in which I received goodies.  When the card looks "interesting" I replace it and use the card for projects.  So this look has been created from a mixture of Colourwash and reinker sprays, Perfect Pearl mists, Glimmer Mist and so is quite unique!  I have embossed this with a Ranger embossing folder.  There is a Snippet of Ranger die cut ribbon and the main image has been stamped using Archival Latte ink and distressed and edged with Gathered Twigs DI.  The whole card has been sprayed with Perfect Pearl mist.

Hope Tim likes and Happy Birthday for tomorrow!

I am also entering this into the Playground as it includes Snippets and to Simon Says Stamp as the theme this week is "Anything Goes".  I cannot believe this is the last CC2C Challenge.  Roll  no 3!

TTFN

Hettie

Thursday, 22 November 2012

Christmas is only ..... days away!!

Hello Friends

I am sure the Elves up in the North Pole are working flat out in readiness for The Man in the red coat to deliver lots of presents next month and much the same can be said for crafters across the globe.  I saw quite a few desks on the WOYWW hop last night with Christmas projects on them.  

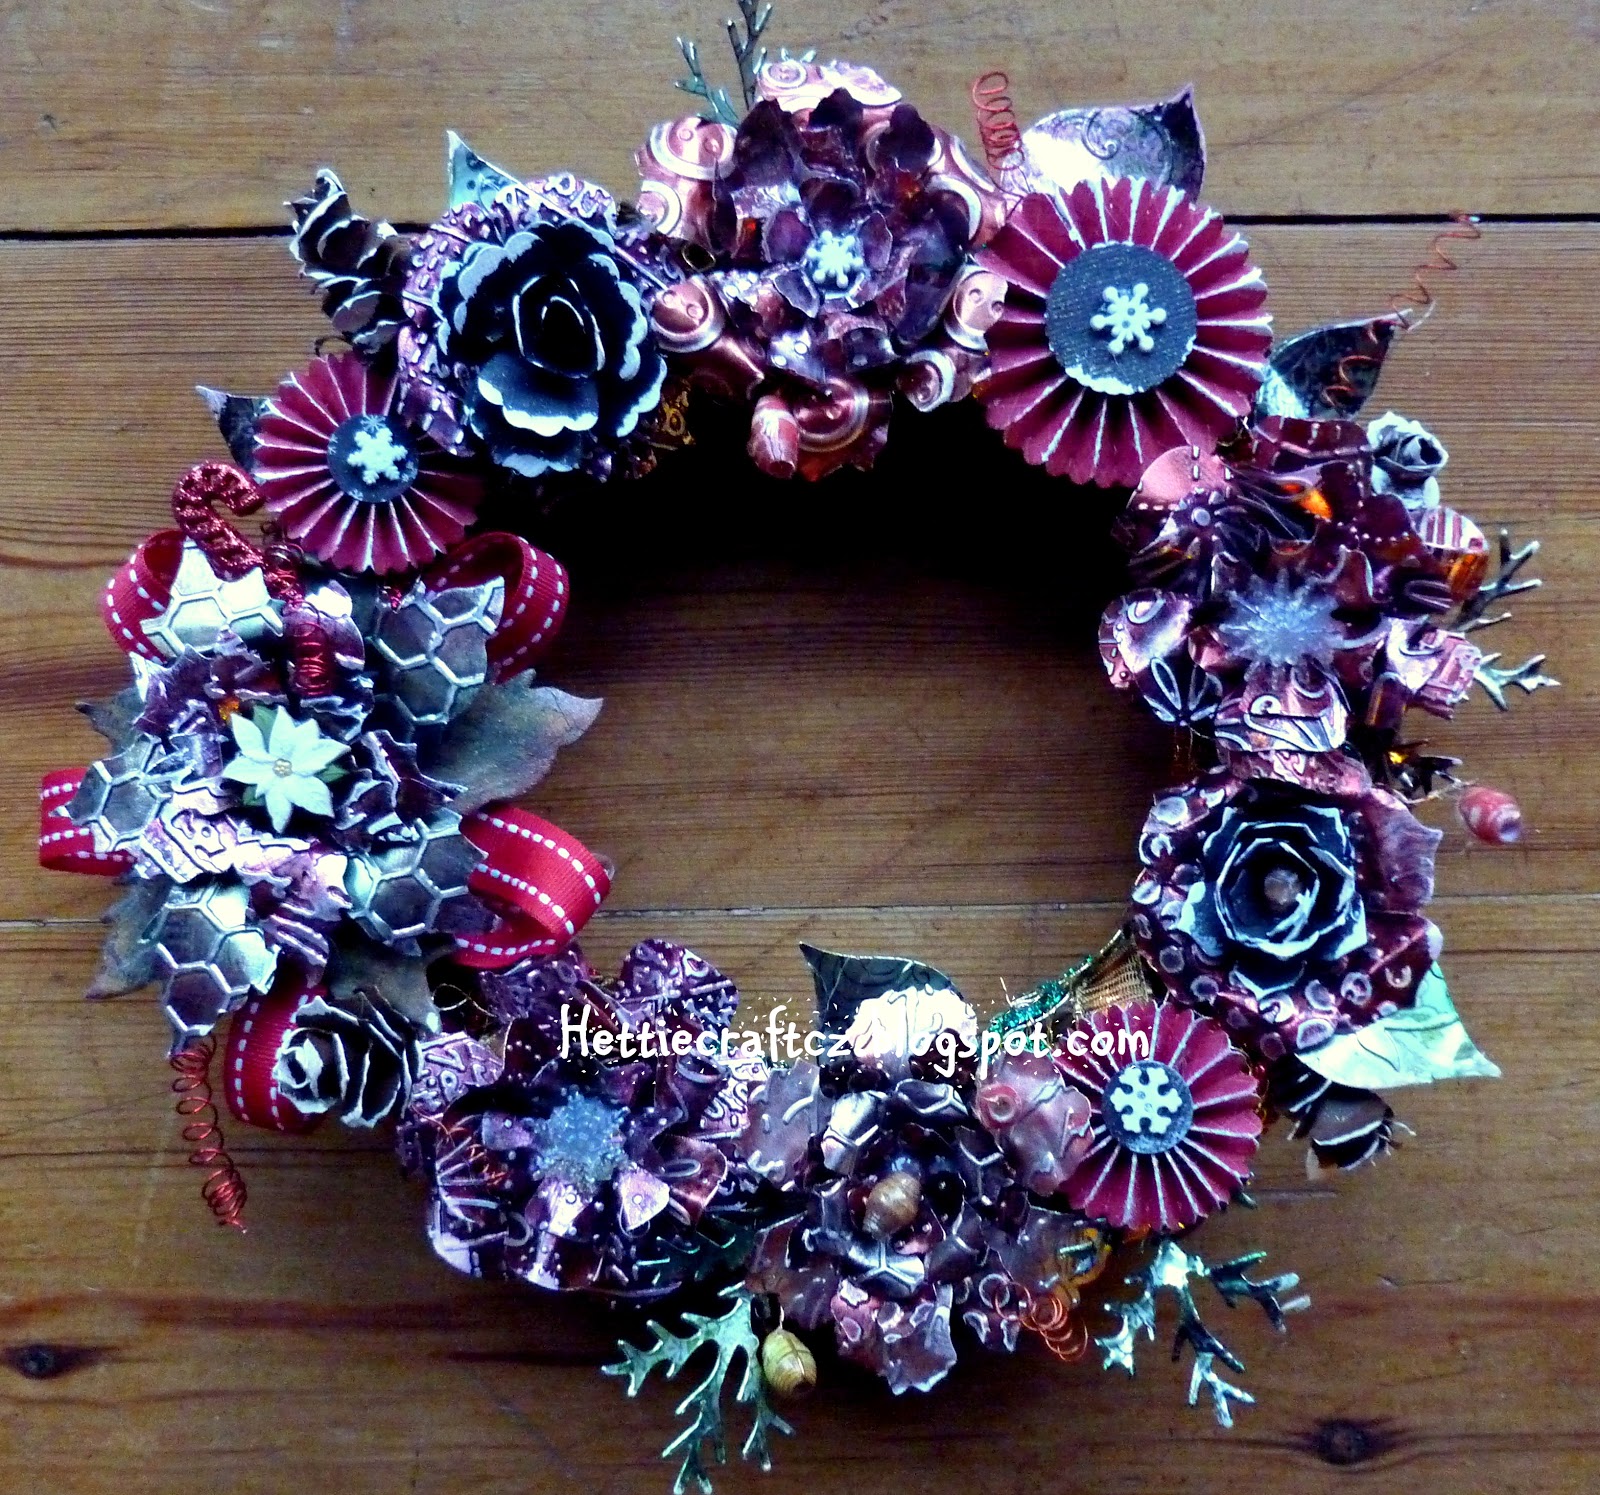
I thought I would share a little something I have made this week and has been in the planning stage for quite some time.  Hope you like it..... 

Shall I let you into a secret?  This Wreath is actually old and recycled!  Yep!  The wreath is willow and I originally decorated it some 4 maybe 5 years ago when I first had my Silhouette machine and discovered Perfect Pearls!!  I cut out lots of leaves out on the Silhouette and then inked them up and sprayed them with Perfect Pearls.  I also made some wire spirals and paper beads, which I had learnt how to make the first time I went to Cornwall. 
And here you can see the wire spirals and paper beads (also recycled).  The flowers are primarily made from metal, some with chipboard bases for firmness.  Some of them are made with metal sheets left over from a project I did in Cornwall nearly 2 years ago and some of them with metal card which I had from Paperartsy when I renewed my subscription to a certain magazine (CS) some time ago.

My new TH Poinsettia dye has been used here with an extra layer at the bottom of chipboard which was covered with paper, inked and stamped.  I wanted to ensure that the poinsettia did not try to wrap itself around the willow wreath.
All the metal was inked with TH alcohol inks, stamped with various stamps, embossed with embossing folders, sanded and then layered using hot glue.  Once I was happy with the flower shape I arranged around the wreath, wrapped the wreath in ribbons, added spirals and beads which were wired in place and then set about attaching the flowers, leaves, pinecones and rosettes using my glue gun. 
Here is a SU punched flower which was actually left over from my recent Halloween Mail Box project which I added some "snow" using my Ranger paint dabber.

Some of the paper beads I used as centres to the flowers and the various snowflake buttons and elements were brought back from the US by my friend last year.  The rosettes were in my box from making them last Christmas for my Christmas Album cover.
Unfortunately these photos were taken in the house so the sheer shimmering effect cannot be appreciated in these photos.  I have sprayed the whole Wreath with Perfect Pearls Heirloom Gold mist which has given it even more shimmeriness!

Thanks for sticking with me to the end!  I hope you like my Wreath and maybe you will feel like making one yourself.  It really is quite simple though a little fiddly.  Also, be careful when using hot glue to affix the metal layers....the metal gets hot too when you push the top layer down with a finger.  Use a pencil instead! 

I am entering this wreath in to the following challenges:-

Compendium of Curiosities - Texture fades
Frilly and Funkie - Chipboard and Metal
Snippets Playground - Snippets
CC101 - Altered Metal 

TTFN

Hugs

Hettie

Sunday, 18 November 2012

12 Tags of 2012 - November!

Hello Friends

As some of you know I went on a lickle day trip to the NEC for the Hobby Crafts Craft Fair the other week and spent some of my hard saved up pennies on some goodies.  Well when I saw Mr Tim Holtz's Tag for November I could not resist (get it!) having a little stamp with some of my new goodies and joining in!   

At the show I had in my hand the set of Tim Holtz stamps or the Soldier die and as you can see the stamps won.  Well, they were on a ridiculously good offer with Craft Obsessions how could I leave them there?  Especially as when I went past a little later all of these sets had gone!  (I am grinning now!)

And here is another little close up so you can see the stamping on the background. This is one of the only times I do not mind ironing!!

Now Mr Holtz wanted us to use Distress Stains but I don't have many colours and certainly not the colours I wanted to use (the Seedless Preserves are to die for!).  So I used the good ole' wrinkle free distress method for colouring the background.  The word "Joy" came from the Season's Silhouettes stamp set.  

Hope you like and please leave me a comment so I know you have been.

TTFN

Hettie

Wednesday, 10 October 2012

CC2C - Like a bit of alcohol.....ink!

Hello Friends

Linda over at StudioL3 has asked us this week to turn to page 59 of the Compendium of Curiosities 2  and following the instructions there make our creation.  I cannot tell you the techniques used but I can tell you it involves alcohol ink.  So here is mine......

I used the 1.5" Memory Glass and frame to make a double sided piece for my Christmas Album that I am currently making, which piece I want to hang on the spine of the book.  Here is the other side.....
I used Terracotta, Red Pepper, Cranberry and Black alcohol inks all by Ranger and then two of Mr T!m Holtz's lovely Christmas stamps to create the pattern with Archival ink.   The frame is also by Ranger and you are not seeing double with the link on the top, I have already added a jump ring to enable me to hang the frame when it is ready! There is also Snippets of metal foil in between the glass so that you can see the stamped patterns nicely.

And just so you can see my Christmas Album in creation (not finished yet), I can show you the undecorated cover with a few other embellishments I want to use on the cover/spine of it....
Thanks for popping by and please leave me a comment.  There is still time for you to join in with this Challenge as you have until Thursday evening.  I am quite surprised that we are on Challenge 24 this week!  It doesn't seem that long ago we started on the first Challenge!  I do love these challenges so thanks Linda!

Don't forget to call in at Mr T!m Holtz's blog for more wonderful ideas and creations.

TTFN

Hettie 

Sunday, 29 July 2012

Hello - This Is Me! My Mojo Monthly Challenge

Hello Peeps

If you pop over to the lovely Sarah La De Dah's blog at the moment, you will find that this month she has interviewed herself and is talking about her background and what has inspired her.  A very interesting lady indeed with a beautiful beautiful baby girl Ruby who was born recently.

Sarah has asked us this month to make something that reflects "Your style".  Well, I had to think hard about this Challenge.  What is my style?  Regular followers to my blog will know that I am a bit like a butterfly going from project to project.  I scrapbook, I love to make mini albums, I make cards.  But when I questioned Hubby for ideas, he pointed out that I also like to take the usual and turn them into something unusual.  So he brought home a wooden artist's model and said "do your stuff to this"!!  Now! that was a challenge if ever there was one!!
I named her Catriona.  Here is Catriona with her tights, pink shoes and pants on!  I wasn't going to show her naked now was I?!!  Funny enough, I was recently at a talk by the lovely Ann Rippon, who said you should always dress your doll starting at her pants, because everyone who picks the dolls up always look up their skirts.  She wasn't wrong!
And here she is fully dressed.   She is the Me I would like to be.  Tall, perfectly proportioned, wears pink and white, does tea with her friends, sews, gardens, sings, talks to the animals, is never seen without her pearls.  Not really me at all  (unless you count me talking to my chickens!).  
Here she is from the side.  You can see spools of ribbon on her base and some of those birdies she likes to talk to.  You can also see her flower (Tim Holtz and brad) in her hair.  
And here is the right side of her with more spools of ribbon.
And the back of her, more birdies and her lovely lacey top she is wearing today.
The base from the back.
The back of her close up.
The beady eyed amongst you may have spotted that her pinnie-on is three Tim Holtz bird cages cut, joined together and inverted.  The ribbons are woven through the holes at the base of the cage. I trimmed the top piece of the bird cages and die cut (Sizzix) hearts and attached.
And here are Catriona's beads and now you can see her lacey top.  A single piece of lace which I wrapped around her torso.  I then cut two more pieces, stitched together into tubes (by hand) and then attached these to the body of the top.  The heart pearl necklace came from a charm on a Primark necklace and the chain was the safety chain section of the same chain.  I often find some of Primark's necklaces do have some lovely charms for crafting with!
And here you can see how I made her skirt and pettiecoat.  I cut a piece of Bo Bunny double sides patterned paper and punched one edge with a Martha Stewart punch.  Then using my Score-it scorer, I scored at every 1/4", folded with valleys and mountains and then punched each flap with my Crop-a-dile to thread the ribbon through.  I turned the remaining paper over and cut another piece, again scoring it at 1/4" and I then cut a lace piece from a Tim Holtz/Sizzix die, attached this to the pink pettiecoat and then attached the pettiecoat to the skirt.  That red tape has really done a great job of keeping these together.  I also inked the pleats of the skirt to add a little definition.
Here you can see the flower, which is a Tim Holtz metal one, painted with white Acrylic Dabber (Ranger) and a brad popped in to the centre and adhered to Catriona's head.  You can also see the ribbons which are holding the skirt and pettiecoat on.  

And now you can see a close up of the base with some more spools of ribbon and Prima flowers.  

I thank you for being so patient in reading all the way to this point, but I wanted you to see as much of Catriona as I could show.  She was soo much fun to dress with paper and lace and Tim Holtz products.  

As the Simon Says Stamp Challenge is "Hey Girl" and they are offering $50 of goodies to the winner, I shall be entering Catriona there too!


I will also be bringing Catriona down to the Snippets Playground today as her lace, ribbon and paper lace are all from the Snippets box.  Please do not take her to the Duck Pond as I would hate for her dress to become ruined!

I would also like to thank Eileen for becoming my newest Follower.  Thank you.  

TTFN

Hettie

P.S.  My friend Nicola of Sunshine Reflections has a Blog Hop on Wednesday in which I will be taking part.  Please pop over to Nicola's blog and see the talented peeps that are taking part.  Oh yes, and me!! 


Sunday, 8 July 2012

CC2C - Configurations - Oh I do like to be beside the seaside!

Hello Peeps

Well I just want to start off my post with a Well Done to all the Wimbledon finalists who made it through to the finals this weekend!  You were all winners in my book!  What a fantastic weekend of tennis you have given us.  And Andy - hold your head up high and be proud!  You fought a good fight!

Now, back to business of tonight's post.  The Compendium of Curiosities 2 Challenge.  The Lovely Linda has given us the task of creating our own piece of art using the Configurations boxes (pages 32 and 34 of the BOOK).  It didn't matter whether we used a configurations box or printer's tray, nor did it matter what size we used.  And this week there is a whole bunch of goodies to be won which were kindly donated by Mario himself!  

I have been wanting to make a box with a seaside theme for ages, for it to go into my bathroom.  I do love to be beside the seaside after all!  Here it is.....

Now where do I start?  The Lighthouse on the top is from Spain when I went to the Quilt Expo in 2002 and has been in my bathroom since.
Here I have made a windbreak using a scrap of fabric and some cocktail sticks.  The mussel and little white shells you can see here I picked up off the beach in Cornwall last September, I bought the other shells you can see here in St Ives, Cornwall on my visit there at a Scrapbooking retreat.  There is also a vial full of golden sand but you can hardly see it in this photo.  The beads to the right are some I have had for a while and the green bead was in a box of nik naks which belonged to Hubby's Great Aunts - no doubt part of a broken necklace.  The pearls were once white but were coloured with alcohol ink in a plastic bag (the beads not me!).

This little box was an "under the sea" theme.  Unfortunately the photo is a little bleached.  At the back you can see some recycled packaging stamped with a sea plant (p62 of the BOOK).  The dark "rocks" are out of the candle bowl in my living room. Some glossy accents to adhere them and a sprinkling of gold micro beads as sand.  The white rock is a piece of abalone from the collection of shells in my bathroom and a pewter shell charm and some word beads.  
Here you see the fishermen represented where St Ives still has a small fishing fleet bringing fresh seafood into Cornwall.  Another pewter charm of a fish hanging and a mussel shell found in Cornwall.  At the back you can just about see a book plate.
A slightly better view of the book plate with faux patina (page 58 of the BOOK) effect.  Some glossy accents with some gold "sand" micro beads dropped in.  
And now the final section which represents beach life. A spade to the left (a brad with the spikes cut off and a heart.  The 46 number (no I am not admitting what that is for!), a sign to the Beach, bucket charm and some flip flops.
Another view of the same box.
Here is the side of the box with some stamping on there and showing the corners attached.  Just need to figure out how we are going to hang it up in the bathroom.  That is Hubby's problem!
The other side with some more stamping.  

Thank you Linda for bringing this Challenge into being.  I have had so much fun making it, despite having blue finger nails to go into work with and a few broken nails!

Don't forget, you have until Thursday evening to make a box and join in. It is sooo much fun!!    

Thanks for looking and don't forget to leave me a comment so I may call by and visit you.  

TTFN 

Hettie

Saturday, 17 March 2012

Ah... Made It....Sorry Miss....I was flying my kite!

Yeay!  Made it!  I have been soo busy flying my kite this week I nearly forgot to post my Snippets cards this week.  I made them quite early on in the week but was having so much fun I forgot to post them for you to see!  So without further ado here they are......

I actually sent this one to my lovely friend!  My fellow Trouble Maker in the Playground!! 

This one I made for my Mummy for tomorrow.
This is a birthday card for my friend and here is the inside.  The others were similar but without the Happy Birthday of course.
I thought I would share with you a photo I took of my new wellies.  You see, I was walking my lovely Dobby over the field early one morning (6.40am in fact) and I had this horrible cold wet sensation in my right wellie.  Yep!  There was a hole in my wellie dear Liza dear Liza, so I had to order a new pair.  Earlier this year my fellow Trouble Maker friend had sent me a link to a website which sold all things Chickens themed.  So I tracked the e-mail down, looked at the site and ordered some new wellies which arrived the next day, bless them!  So here they are....

Now you know what I am wearing when I am flying my kite!!

Now back to the subject of this posting.  Snippets.  I am sure you all have some in your room, closet, trolley, box etc, so why not dig them out, make a card, layout, book or whatever, and join us all in the Playground which is HERE and run by the Lovely Di!

Tag you are It!

Hugs

Hettie

Ingredients:  Stamps - Cavallini and Stampington, Penny Black, Papermania; Inks - Ranger Archival and Distress Ink, Copic; Die - Sizzix; paper, card, string, button, ribbon, lace from boxes and bucket!

P.S.  Well done Boys.  Da Iawn.  Now I just have to grow my finger nails again as I bit most of them off with the tension!!