Showing posts with label stencil. Show all posts

Tuesday, 6 October 2015

Oo la lah!!

Hello there

How are we all doing?  I hope you have not been washed away with all this rain we have had in the last two days.  My wellies are wearing out and I will need to ask Santa for a new pair for Christmas!

I wanted to show you a card I made for my niece recently for her birthday.  As you can tell from the photos it was a beautiful sunny morning when I took the photos before handing it to my sister for when she returned home from Geneva.....


Lots of stencilling, inking, stamping, die cutting, spritzing, flicking and embellies....

The Eiffel Tower is a new die which I bought some time ago in a sale..

I inked up a Snippet to make the sentiment here...

Aren't these embellies gorgeous?  The key is a Kaisercraft one which again was NBUS bought for me as a birthday pressie - MWAH - you know who you are....

The lower one is a TH embellie bought eons ago!

And of course I needed an envelope that would take the tower...


......courtesy of my We R Memory Keepers board.

Off to join in the fun in the Snippets Playground.  Got me souwester on and my wellies...who wants to come puddle jumping with me?

Hugs

Hettie

Tuesday, 4 August 2015

Get Well Soon George...

Hello there

Wonderful "summer" weather we are having....NOT!!  Come on summer!! 

I was pootling around my blog and found this in my "draft" or should that be "daft" posts so thought I would share it with you.

Not much to say other than I did a little stenciling, picked some papers out of the Snippets drawer and stamped a Cockeral and coloured him in with Copics and a teeny bit of H2Os on the feathers in his tail.


A little bit of string and a heart cut from a previous card and hey presto a card for my friend George who was poorly at the time.

Off to the Snippets Playground with this.  I understand Miss is having a rest (playing hookey to you and me) and Eve is in charge this week!!  I hope she has eyes in the back of her head to keep an eye on all the mischief makers.  You know who you are!!

Thanks for calling by.

Hettie

Wednesday, 4 March 2015

Sealed with a Kiss....Layout

Hello there

I have to apologise to my blog for neglecting it for the last few days.  I have been a little under the weather with the lurgy after someone very kindly coughed and sneezed on me last week.  I came home from my Quilting Group on Saturday feeling dreadful and got generally worse.  I am not going into details ok, but I did not get out of bed much until today.  Though I did have a shock when the person concerned phoned me yesterday to apologise!!! 

Anyway, a few weeks ago I promised to share with you a little layout I had done so here it is...


 This is most probably the last layout of my Wedding Album, but note I only said "probably"!!  I have so many photos left still!


So where do I start?  The background piece is a piece of black cardstock and I took some of my stencils, my old white ink pad and an inkie paddie thing (can't remember what you call them now...made by that Tim chappie!) and swooshed some ink through the stencils, one of which is a NBUS bought from US by Memory Box...the one with butterflies on.

The die cuts are a mixture of some that were kindly sent to me by my Buddy over the water and some from my Tin of Shame.  The TH clock one was originally a wishy washy beige colour when I started.  I smooshed some TH DIs Tea Dye, Gathered Twigs, Brushed Cord, and then rubbed some Treasured gold wax on top.  


The PPs are bits left over from previous layouts so Snippets...yeay!!  The corrugated card is from a package that had arrived a few days before (again inked with some DIs as above.

I put the little birdies on top as a nod to the pair of seagulls we kept seeing on Guernsey where we got engaged.  Now THAT is another story and why there are two seagulls in our bathroom!!
Now the flowers.  The one at the bottom of the clock and the others like it are NBUS and by Prima.  I only used a few as they are soooo nice.  Can you see the little seeds popping out from behind the flower towards my arm?  There are a few of these dotted around and they came out of my Happy Post I received just before Christmas, along with the sparkly heart...Thanks again my Friend.

The other flowers were made up from flowers in my stash, brads in the middle, some of which are years old, sprayed with Glimmer Mists, Perfect Pearls, layered and scrunched up. 
The MS Monarch butterflies came out of the Tin of Shame and there are others that I made using old books and my SU die.  

I wanted a little bit of watch parts in there and I saw a key somewhere when I was gathering things up so thought I would throw that into the mix too along with a NBUS TH card.  I tied the ribbon with a little bit of silver grey ribbon that was actually adorning a present my friend gave me at Christmas.  Waste not and you will want not.  Lace came from Funkie Junkie.  Only a little piece as it is too nice to use all in one go!
The leaves you can see were punched out of Snippet using my MacGill punch and inked up with DIs.

Finally I used my Cricut to die cut the  title which I cut twice to give it a bit of oomph!  Then I smooshed some more wax around and spritzed a little perfect pearls on there. 
Love the layers you can see in these last two photos.  

Hurrah!  You have made it through to the end.  Well done you.  Unless of course you skipped and just looked at the photos!  I don't mind but please leave me a comment to let me know you have been.

I am taking this over to the Playground for a ride on the swings and then cosy in front of the fire.  I am also entering this into Shopping our Stash as they are looking for old brads...mine certainly count as they are ancient!  And I will flutter past the Butterfly Challenge as there are some hexagons on my layout.   Not very often I get to link up with a few challenges!!  Woo hoo!!

Thanks for being patient.  See you all soon.

Hettie

Thursday, 11 December 2014

On the 11th Day of December....4th Tag of Christmas Funkie Junkie Style

Hello there

Is it me or is it getting colder right now?  Brrrr!  

Today I am sharing my latest card in my Funkie Junkie 12 Tags of Christmas...

Here is Linda's inspiration...

For my card I made myself another stencil using my Silhouette.  I am running out of stencil plastic which is not exactly easy to get hold of in this neck of the woods.  So I tried an alternative substance.  You know the dividers that you can get at the stationers that are made of thin plastic?  Well I found some in my drawer in work which the lower numbers had been used.  Well, the inner magpie in me said not to throw them away and an idea was born.   Other than the fact that they are a little thin and need handling carefully, but they do work!!  I sprayed the backgrounds with what was left over from my other spraying I did the other day for Tag 3.
The image does have holly but unfortunately I covered most of them up!  The Artistic Outpost border stamp was already stamped last year but I never got round to using it so I just stamped the other three stamps using Festive Berries and NBUS Evergreen Bough DIs and cut the edge using my pinking shears and then inked with FB DI.

As you may realise my "tag" is a little bigger than a normal tag.  I am making cards instead of tags.  So I added a little MB NBUS Woodland Deer which was cut out of Snippets, inked and embossed with clear embossing powder.

As always this challenge is being sponsored by the Funkie Junkie Boutique.  

As I made a few backgrounds and I had more of the border stamps, I decided to make a few more cards - Yippee!!

I am taking this down the Snippets Playground as there are lots of Snippets used here.  I hear the Nativity Play is going well and there is a Tea afterwards with mince pies and goodies!!  I am guessing there is some pop going down behind the bike shed too with a certain Elf!

Thanks for calling by.  

Hettie

Sunday, 7 December 2014

On the Seventh Day of December...Third Tag of Christmas Funkie Junkie style.

Hello there

Sorry I missed posting yesterday but we had our last Quilt meeting of 2014 and the last in our current venue, so I was out early in order that I could help pack our cabinet up ready for it to be moved.  A lovely lunch was had and I will share the Bran Tub present I made shortly, now that the recipient has received it.

Now on to today's card which I am sharing.  As you will realise by now, I am following Linda of Funkie Junkie's 12 Tags of Christmas, but with cards instead using Linda's tags as inspiration.  So without further ado here is #3...

And now here is Linda's inspiration tag...
 
Isn't Linda's tag just beautiful?

So I guess you want to know what I did?  First off, I didn't have a stencil with snowflakes on so I resorted to my trusty Silhouette and found a snowflake background which I then cut using quilting stencil plastic.  I do love it when my hobbies collide!  I will say this cutting and picking all the plastic took quite some time, but it was well worth it as I know I will use this stencil A LOT!  Thanks Linda for making me look for this. 

Now next mission was to create a background.  I tried first off with some Pine Needles distress stain but this came out too heavy and darker than I wanted.  Hmmmn.  Next idea!  Ahhh Colourwash!  Now I still have the original set of these and there is a beautiful greeny colour called Bottle in the originals.  I poured some into a mini spray, added some Perfect Pearls and topped it up with water to lessen the density of colour and the pearls gave it a fabulous shimmer.  Once this was sorted I wanted some shimmer around the card so I stamped with my Hampton Arts speckled stamp and Versamark. First I used silver embossing powder and then Wow Sparkling Snow embossing powder.

Background sorted, now I needed to work on the rest of the card.  I wanted to add a little metal on there so found a small Snippet of Ranger foil tape, mounted it on to card and then used some Adirondack alcohol inks on there in Copper, Stream, Clover, Silver and and stream.  Once I was happy with the background I then ran it through the B/S with my TH showflake embossing folder and sanded it before trimming it to size.  

For the Snowflake I decided to use the TH snowflake die and a Snippet of white card to which I inked some Pine Needles DI before punching the last bit of embossed metal for the centre.  

Now just for a sentiment for which I reached for my current favourite TH stamps.  I used TH Archival ink and some clear embossing powder.  Once heated and dried I trimmed the card to size, mounted it onto some silver cardstock before placing this onto a blank white card which I had inked with Pine Needles DI.  

Thanks once again to Linda for the inspiration for this card, which so far is my favourite, but at only #3 this may be subject to change!!  Watch this space!!  And thank YOU for visiting my blog and please do let me know what you think of this card.  I do love to read your comments.  Why not give the challenge a go?  It is sponsored by The Funkie Junkie Boutique and well worth entering just to have a spend in Linda's store.

I am sharing this card with the Snippets Playground too as there are several Snippets used up here.  

Have a great week.

Hettie


Tuesday, 2 December 2014

On the Second Day of December....First Card of Christmas Funkie Junkie Style

Hello There

Thank you all so much for visiting me yesterday and leaving me kind comments on my Christmas Album.  Yesterday I got two photographs, one of myself decorating the Office Christmas Tree and one of a colleague putting the Star on top!  I printed them off but they were a little tacky for me to trim and put in the Album so I will do that later today.

Now for today's Christmas offering.  Those of you who have followed me in previous years will know that I usually follow Linda at Funkie Junkie with her 12 Tags of Christmas.  I LOVE doing these tags and often end up incorporating the ideas and techniques into cards.  This year I have decided to do just that...make cards for family members instead of tags.  So here is Tag/Card 1....


There is A LOT of NBUS goodies on here (I actually made this about two weeks ago, but wanted to share them all in December!).  

Here is the Inspiration Tag from Linda's post...


So as you see I have taken quite a few elements from Linda's tag.  The background is TH stencil.  I have also used the same stamp set.  I decided to use my TH Believe stamp.  I think this was the first TH wooden stamp I ever bought.  Believe is my favourite word!  I used a little washi tape around the bottom....you may notice I have a bit of a reindeer thing going on right now!!   You should see my house when it gets decorated up!

I embossed my reindeer and sleigh to make it pop out, after inking it with Archival ink.  I am hoping you can see that I also stamped on top of the card with the snowflake stamp and white twinkly embossing powder.  Believe me it is there!  This dull weather is not condusive to good photography right now.

Inks used are TH DIs Gathered Twigs, Festive berries, Rusty Hinge, Antique Linen and Scattered Straw as well as Archival.  Embossing powders are Wow and my old faithful clear which has been in a different pot so long I have forgotten who's it is!

Now then. Linda's Challenge is open until midnight 21st December.  It is sponsored by the Funky Junkie Boutique.  If you have never had a look at that store you will be in for a real treat let me tell you.  Click HERE and it will take you over to Linda's blog where you can see all the rules and how tos you require, but not before you have left me a comment please!  Just by reading Linda's how-tos you will learn a lot of new tricks and ideas for future projects.

Thank you all for calling by.  I just love reading your comments, so please let me know what you think.  Also, a big Thank You to Kathy for becoming my latest Follower.  I always love new followers too!

Tomorrow I have no dancing class so I shall be joining Julia and WOYWW with another Christmas themed post.

Hettie


Monday, 17 November 2014

Playing with NBUS Stencils...

Hello there!

I trust you all had a good weekend?  I had my first Quilting Group meeting as the new Chairperson!!  I think it went alright.  Believe it or not I do not like speaking to groups so it is quite nerve racking for me!

Yesterday I spent the day away from the puter and playing with some Christmas baskets that I made, I will share those later on (I forgot to take a photo this morning and as it will be dark when I get home I will have to take them tomorrow - doh!).

So here are some cards that I made earlier...

I do love this purple on these cards.  I do wish I could remember where I got them from.  They are 4x4" and there weren't envelopes so I tend to make my own.  As you can see I have the knitwear stencil from Tim Holtz, another acquisition from my rent trip over the pond.  

The top card was actually quite tricky because the card is pearlised and the paste is Sweet Poppy pearlised paste, they slid a little,  I recently bought some Ranger paste to try that as the SP does slip under on the plastic stencils.  Does anyone else have trouble with this?

As for the rest, the tiny tags are cut using TH die and Snippets  the ribbons were from my stash and the snowflakes were cut using Spellbinders die and Snippets from my Christmas basket.  The Stickers are also TH, as is the Believe stamp.  The word Believe is my favourite word.  It gives us all hope!

Right, as I have rambled on enough now I shall potter down to the Snippets Playground and see if anyone is bunking off school to play hopscotch!  I really would like to win the die that Miss is proffering around this week!  

Hettie

Sunday, 31 August 2014

Under The Sea...

Hello there

Last year I made one of my Stencil cards HERE for my friend for her birthday.  That started it!  Rachel started to ask me about the stencils and how-tos and I sent her to Sweet Poppy Stencils to have a look.at the stencils available.

Rather than let Rachel buy all the equipment I invited her up to my Craft Room over we had an enjoyable evening of pizza and stencils and fun!  Rachel was smitten!  Rachel ordered some paste and other paraphernalia the next day and kindly bought me a stencil to say "thanks". I am not sure her Hubby feels the same way.

Well whilst the equipment was out so I set to and made a card for my friend's daughter.  I was told quite categorically that she is no longer into "cute" so I hoped this didn't fall into the "cute" category!

I made the background by smooshing some DIs onto my craft mat (Mowed Lawn, Broken China, salty ocean) and then added some water and dipped a piece of watercolour paper in, dried it and then dipped again.  I had a tag handy so dipped that with the leftovers.  Once it was dried (and ironed) I stamped my Ryn stamp that Miss Di had sent to me some time ago, with Memento ink.  I also stamped the corners with Cavallini stamps in the same DIs used. 

Then came the fun bit.  I used my new stencil and Pearl embossing paste and left it overnight to dry
I stamped both sides of the card using some TH stamps and my Ryn stamp. 
I found a tiny piece of paper that was enclosed in a papercraft magazine many many many years ago that was the perfect colour aka a Snippet.  I die cut a silver edge die, layered it and hey presto, my card was born.  And it passed muster so it isn't "cute"! Phew!!

Thanks for calling by.  Off down to the Snippets Playground to share this.

Hettie

Sunday, 24 August 2014

Stencilling again...

Hello there!

Brrrrr!  Boy it is mighty cold here tonight!  Not like August should be.  I cannot remember the last time we lit the fire in August!!

One of my friends asked me to make her a card for her friend similar to some I made a little while ago in purple and orange (our company colours).  So I made this one...

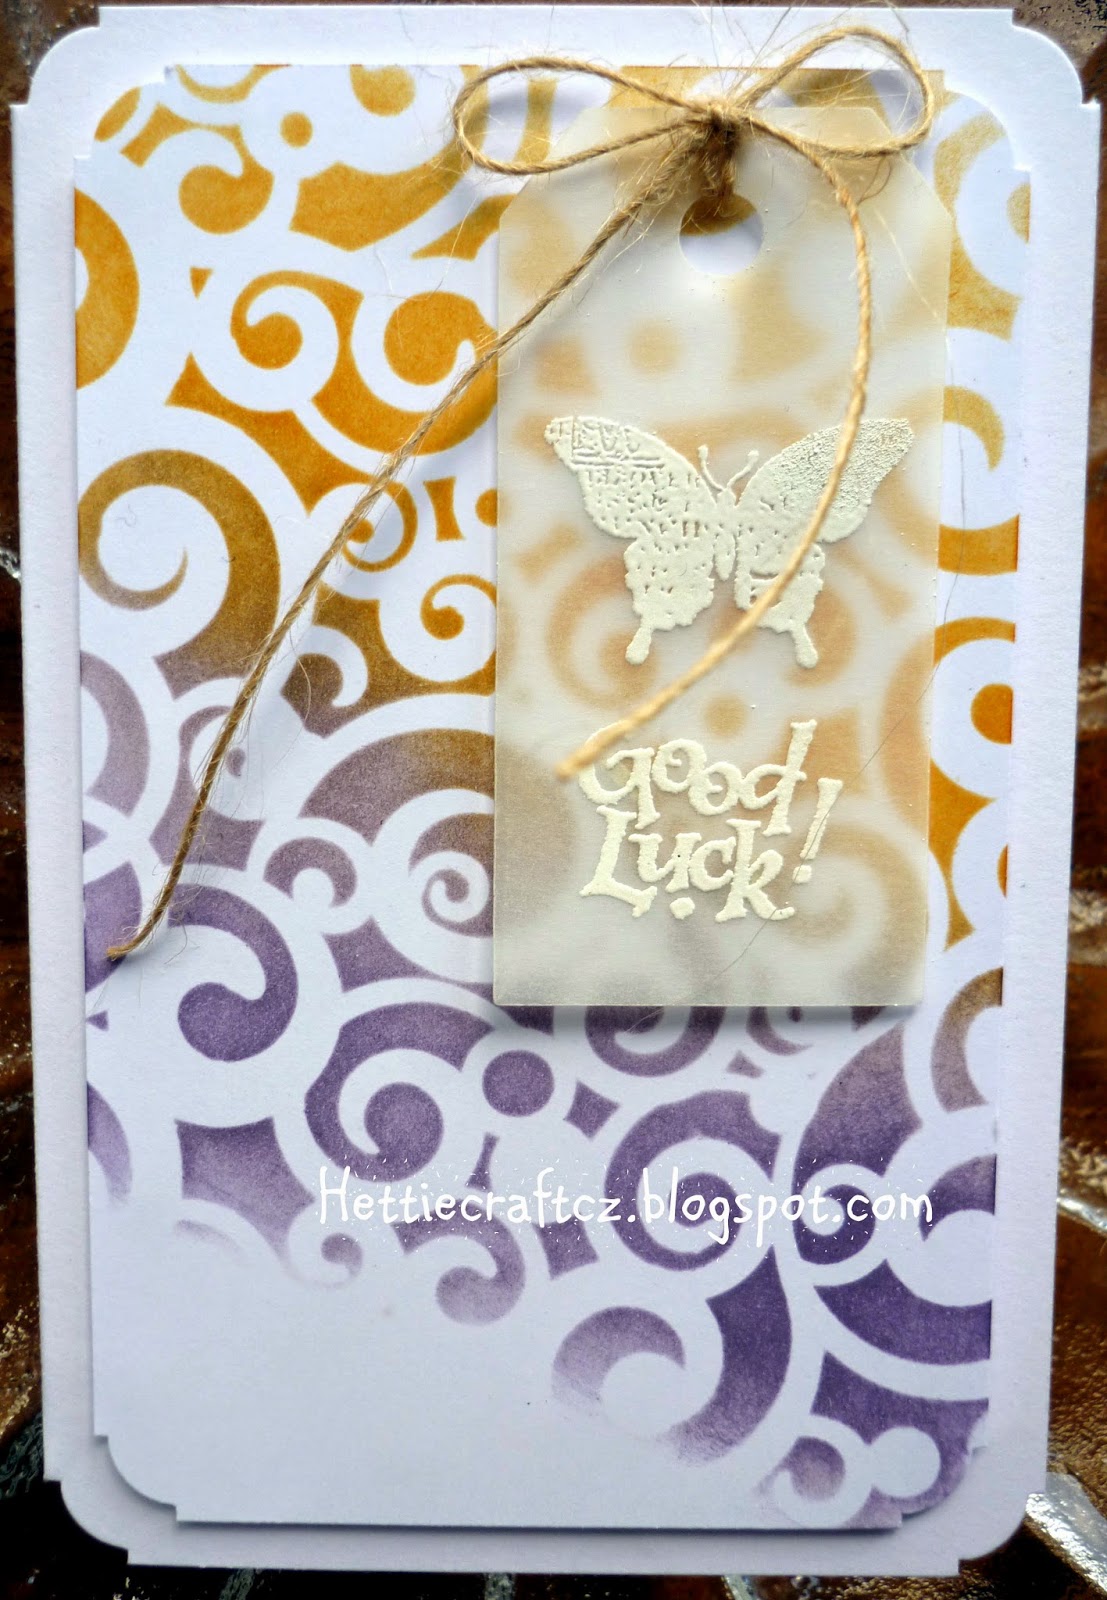
I used Spiced Marmalade and Wild Honey along with Dusty Concord and Seedless Preserves DIs and a swirly stencil. 
I used a Snippety Snippet of vellum and cut a tag using a TH die.  I stamped the SU butterfly and sentiment with clear embossing ink and WOW white embossing powder.  I tied some string and then assembled it all together.

I made a spare too.
And you know how it goes...whilst you have the stuff out you may as well make another...

I have left the inside blank for using at a later date.

Right then.  Bank Holiday Monday tomorrow and we have wet weather guaranteed.  Booo.  You know what that means don't you?  No?  Time to play in my Craft Room!!!  Yipppppeeeeeeee!!!

Have a good 'un whatever you are doing!

Off to skip down to the Snippets Playground in my PJs to take these down to the Treehouse!  I am also just about able to link this with Simon Says Stamp's Anything Goes too.

Hettie

Thursday, 6 March 2014

Silhouette Mat Replacing Tutorial, Home Made Stencils and Cards......
Hello Friends

Before I start I would like to thank my latest followers Denise and Princess Judy.  Thank you both for following me and I hope you enjoy the ride!  You might want to get yourselves a cuppa before reading today's post.

This is a project I was doing just before I fell ill but haven't got round to sharing it with you.  I joined an online class for stencilling - something which I have dabbled in but I don't use them a lot.  The online class is available after the class finishes so I can dip in and out of the course when I feel like (just as well as I fell ill at the start) and it is kept there ad infinitum.  

My choice of stencils is limited, hence why I don't use them an awful lot and I had a brainwave! (Yes it hurt!) I have template plastic (VOS) for creating quilting stencils.  Would it cut on my Silhouette?  Sounds simple doesn't it?  However my cutting mat for my stencil was naff not very good and I wanted to do this there and then.  Also, the mats have become very hard to source and very expensive since I first had my Silhouette.


So I took a sheet of laminating plastic and laminated it.  Took another sheet of laminating plastic and laminated it with the first laminated sheet inside it.  Are you with me?  Then I placed some masking tape down the long edges of the "mat" about 1/4" in.   
Then I took my Crafters Companion Stick and Spray Temporary glue. (We don't want it sticking there forever do we?)  Something else I bought ages ago and have not used much!  

I then sprayed the mat lightly, covering the surrounding area first, with about 5 thin coats.  I then removed the masking tape and replaced it.  These are where the wheels move the mat along the cutter, so you don't want them tacky.

To protect the mat between uses I took some freezer paper and cut a piece to fit and use it shiny side down.
Then I downloaded a design from Silhouette, placed some template plastic on the mat and watched with baited breath to see if the plastic would cut.
I need not have worried.  It cut like a hot knife through butter and the mat did it's job perfectly.  This design is called "Kite".

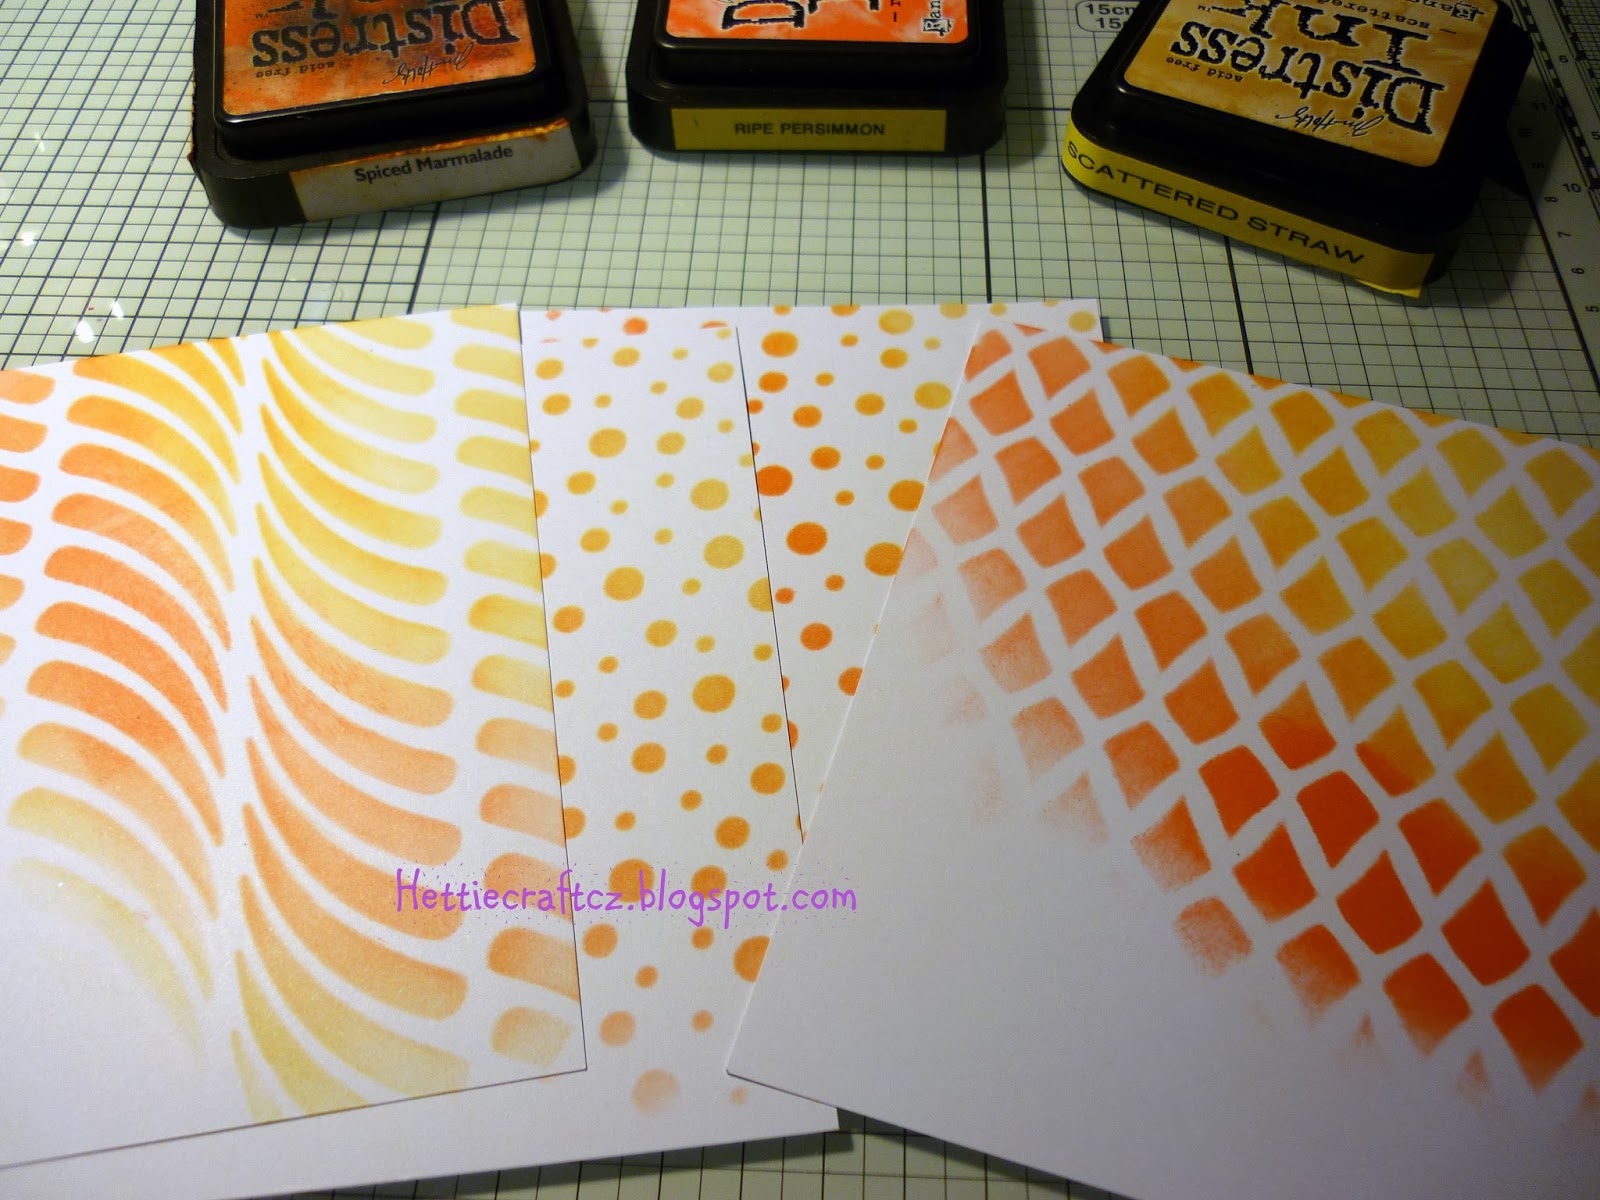
Here are some samples I made using just three colours of DI.
And some finished cards....


I used some Snippets of vellum, cut some tags (the snippets dictated that some of the tags are shorter than others), tied some twine and adhered them to the card using a teeny bit of glue behind the twine and another behind the butterfly.

Overall I was extremely pleased with the mat and the stencil.  So much so I went online to a very well known auction site and ordered some A4 template plastic so I could make some larger stencils.  All this came with a bonus - all the materials were already in my craft room.  I love it when two crafts collide (template plastic and freezer paper both being quilting tools).

Whilst I don't suppose Silhouette would advocate making your own mats, when they are getting like hen's teeth to get hold of then what are we supposed to do?  If you decide to try this, do so with caution.  I am no expert and will not be held responsible for any mishaps.

Thanks for calling by.  Sorry it is a little long today but I wanted to show you how I created these stencils. Please let me know what you think!

Hettie